Integrations
Configuring Facebook Integration
Please note the information below are strictly for information purposes and are not supported by Parker Software. Any questions on Facebook app creation, should be directed to Facebook support.
Requirements
- Admin access to Facebook Pages(s)
-
Access to Facebook Developer Account
-
Create a Facebook app on the development portal -- https://developers.facebook.com
a. Select Get Started
b. Sign into your Facebook account and register your account
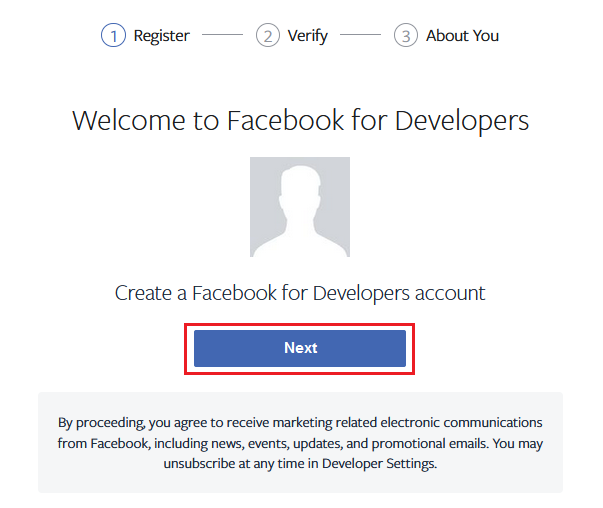
c. Verify your Identity by entering the required details.
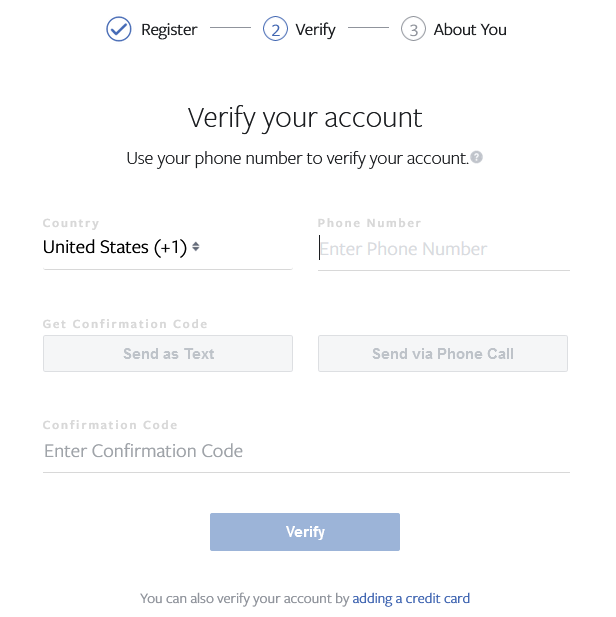
d. Select an option that best describes you.
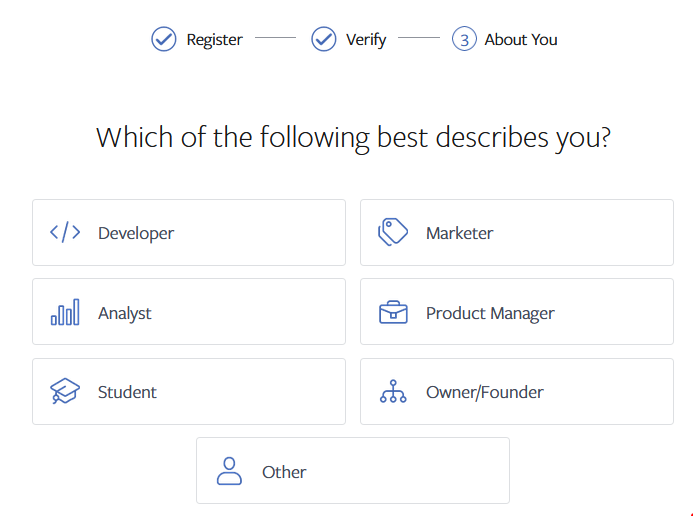
e. You will now be presented with a welcome screen, select "create your first app". If you are not familiar with Facebook developer portal, it is highly recommended that you review Facebook Documentation.
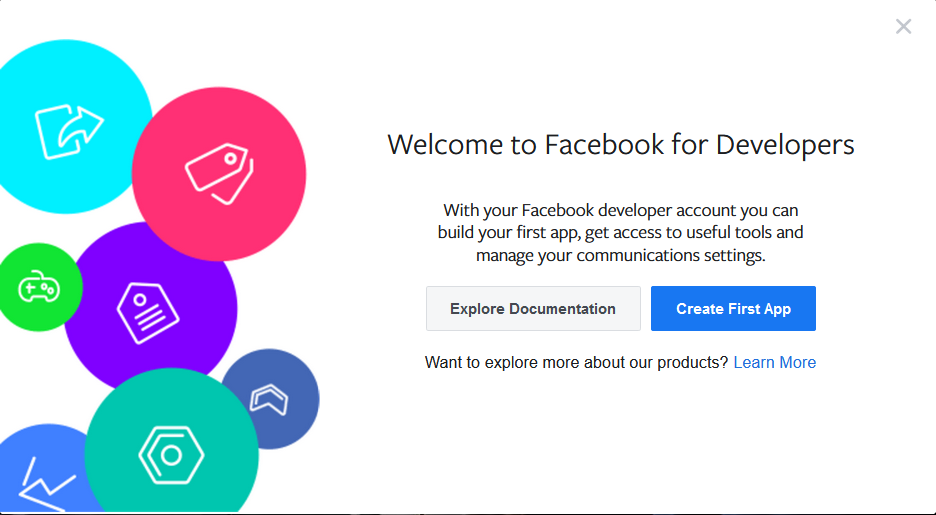
f. Create a New App ID
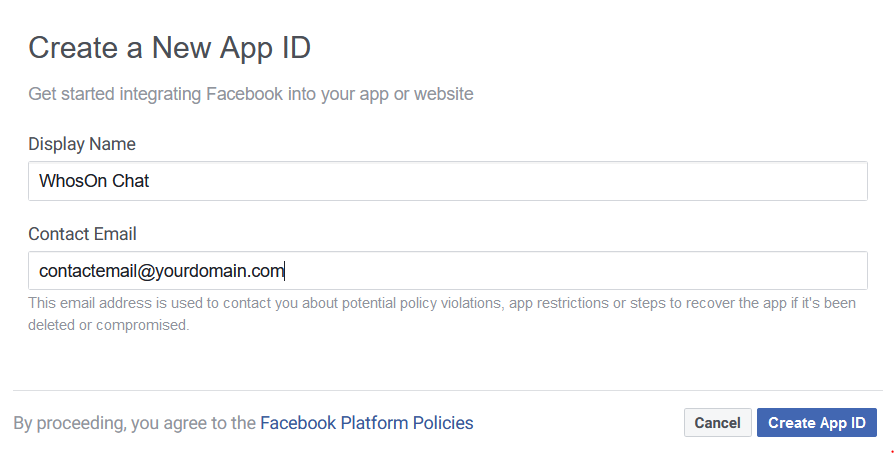
g. You will now be taken to Facebook's developer portal. Select Setup on the messenger applet.
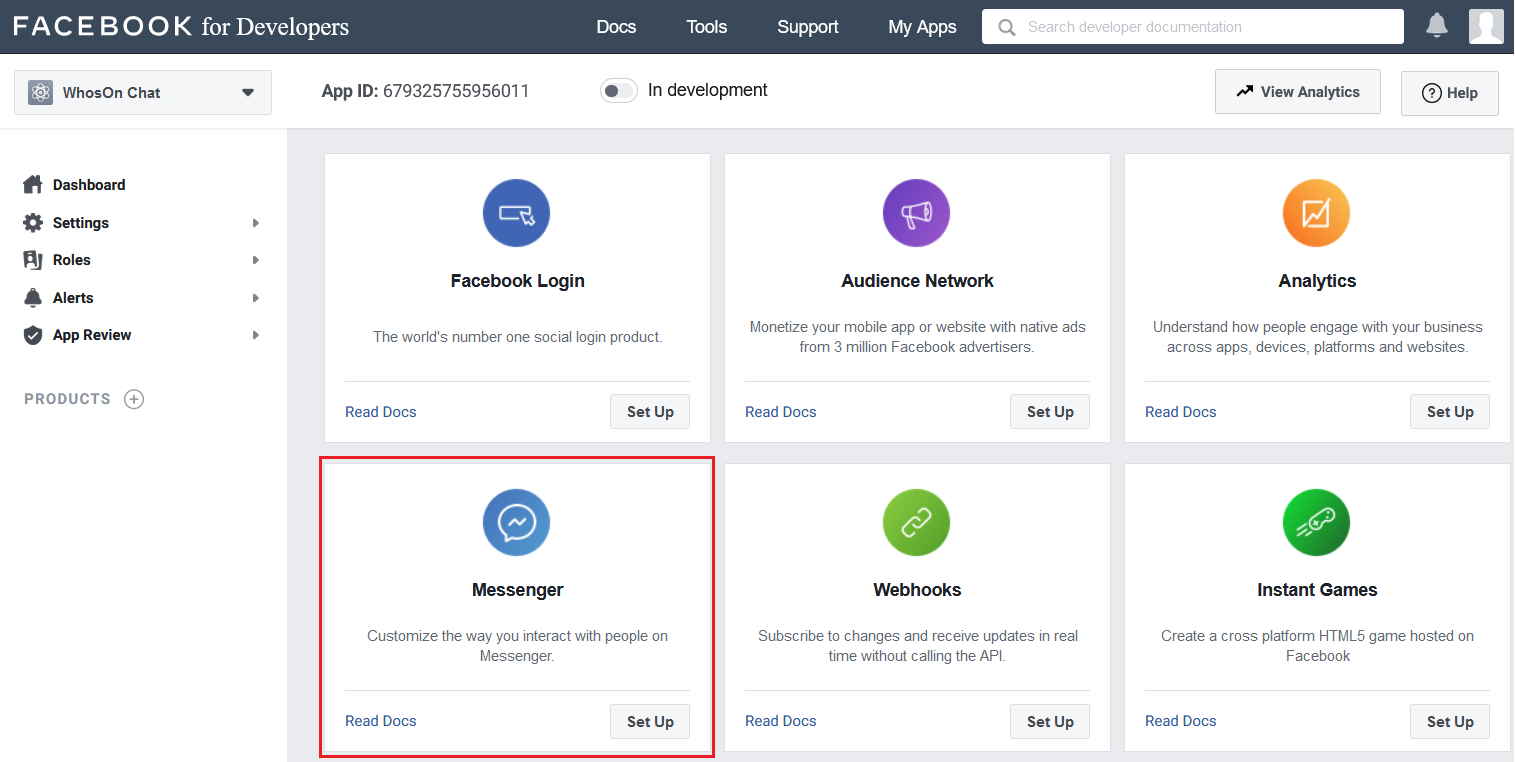
h. Next, add a page(s) to the application access tokens
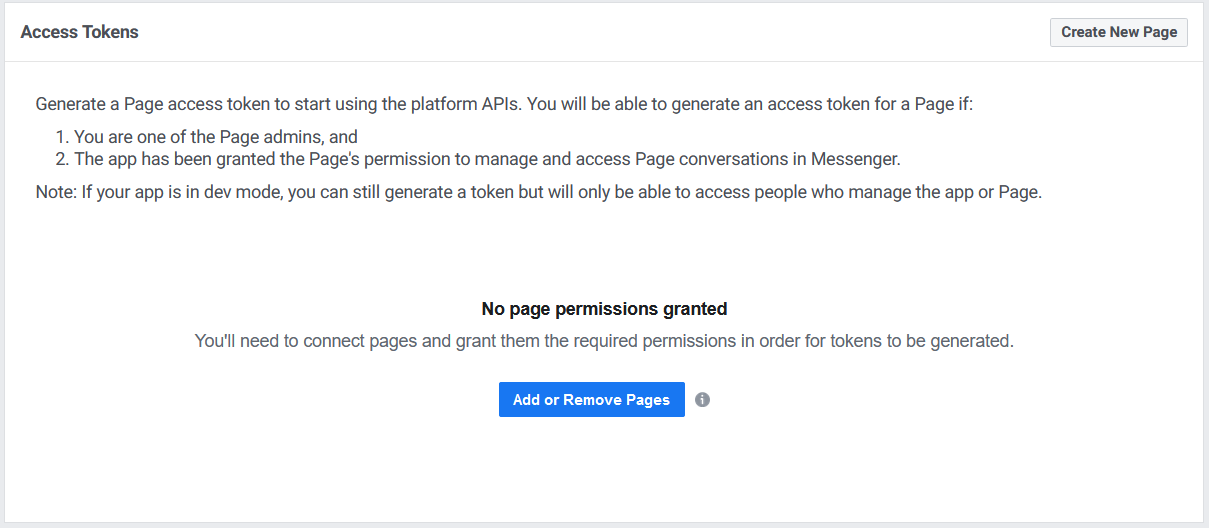
i. If there are no page(s) associated with your Facebook account, create a page, or select from an existing page to continue.
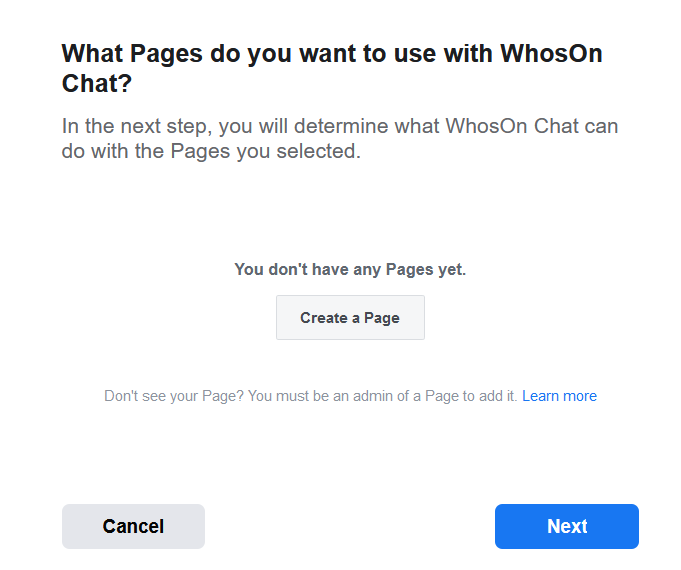
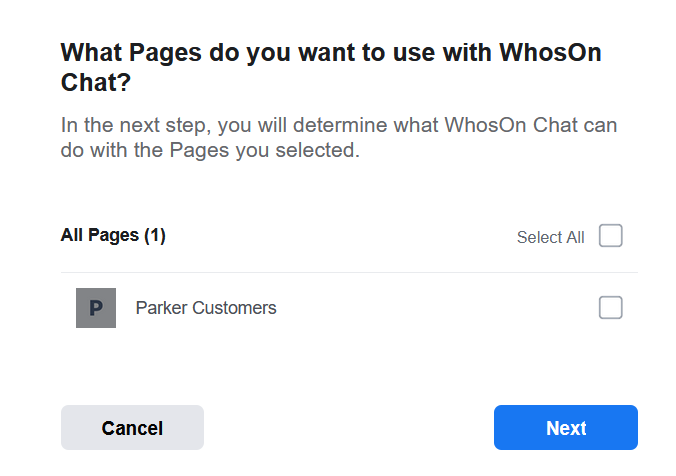
j. Provide permission to the newly created app. Please note in order to publish your app, it will need to be submitted to Facebook for reviewing. Select Submit for review now and wait for approval.
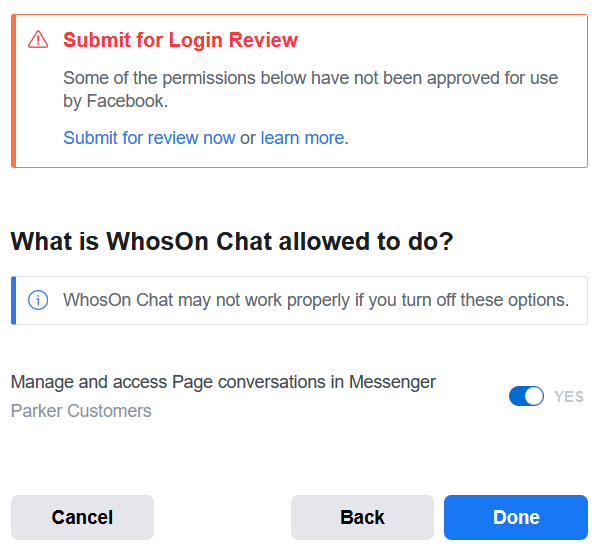
k. Once your app is approved, you can now link your app with Facebook.
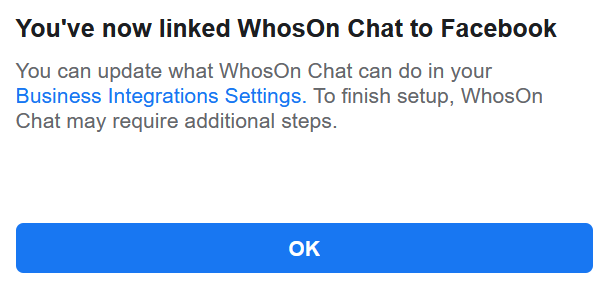
- Now that your page is created, it will be listed under Access Tokens.
a. Generate a token for WhosOn to use.

b. Copy the token
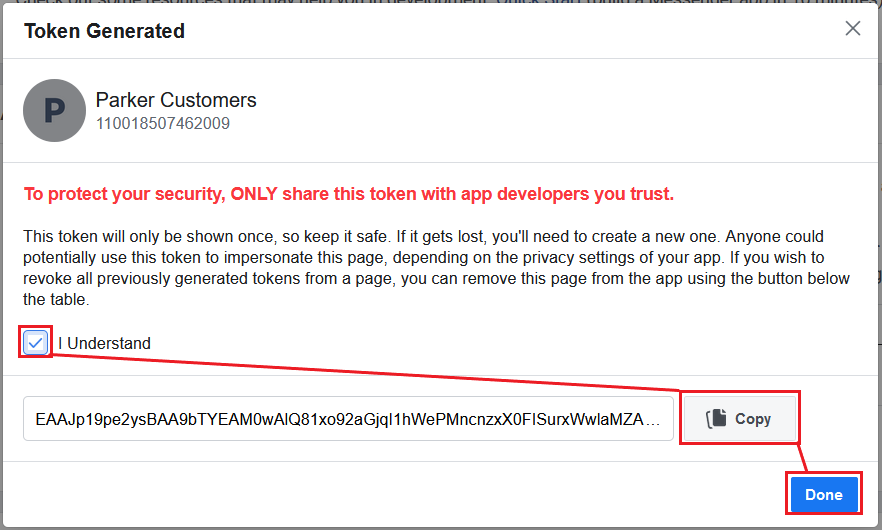
c. Enable Channel to display the API Token and Page ID fields.
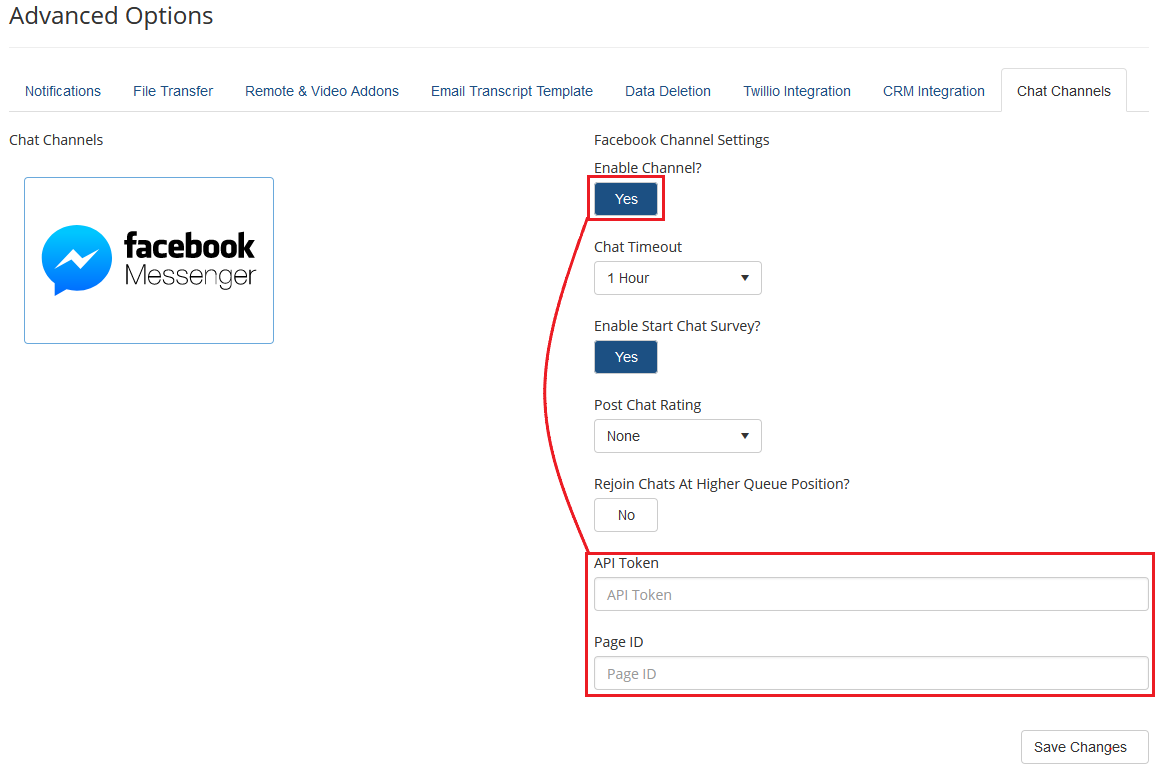
d. Paste the Token into the "API Token" field inside WhosOn Settings Portal.

e. Copy the highlighted long number under the page title from Facebook Access Token page

f. Paste the number into the Page ID field on the settings portal and save changes.
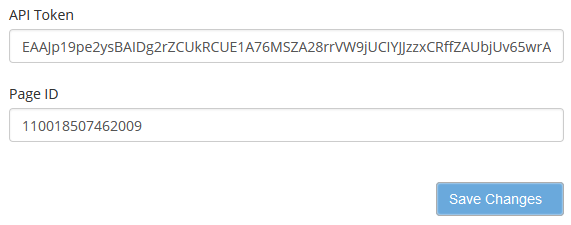
- Next, Setup webhooks

- Enter your WhosOn Chat URL into the callback url in the format of -- {WhosOnURL}/messaging/api/facebook and add verify token: f4e9bc6492b343139795b522fa7a669b.
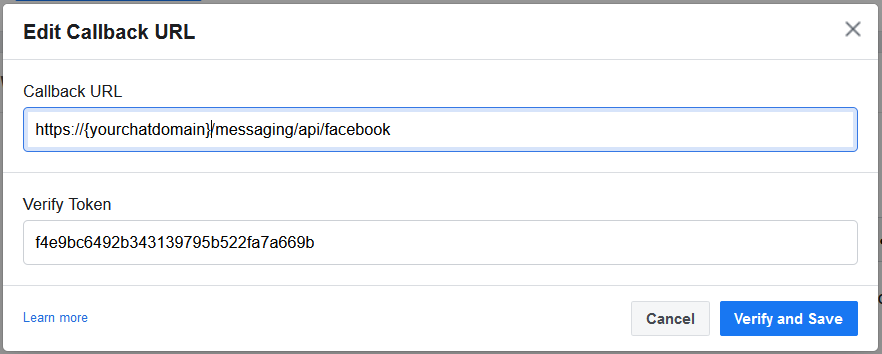
- After verifying and saving the callback URL, your page will now display under webhooks.
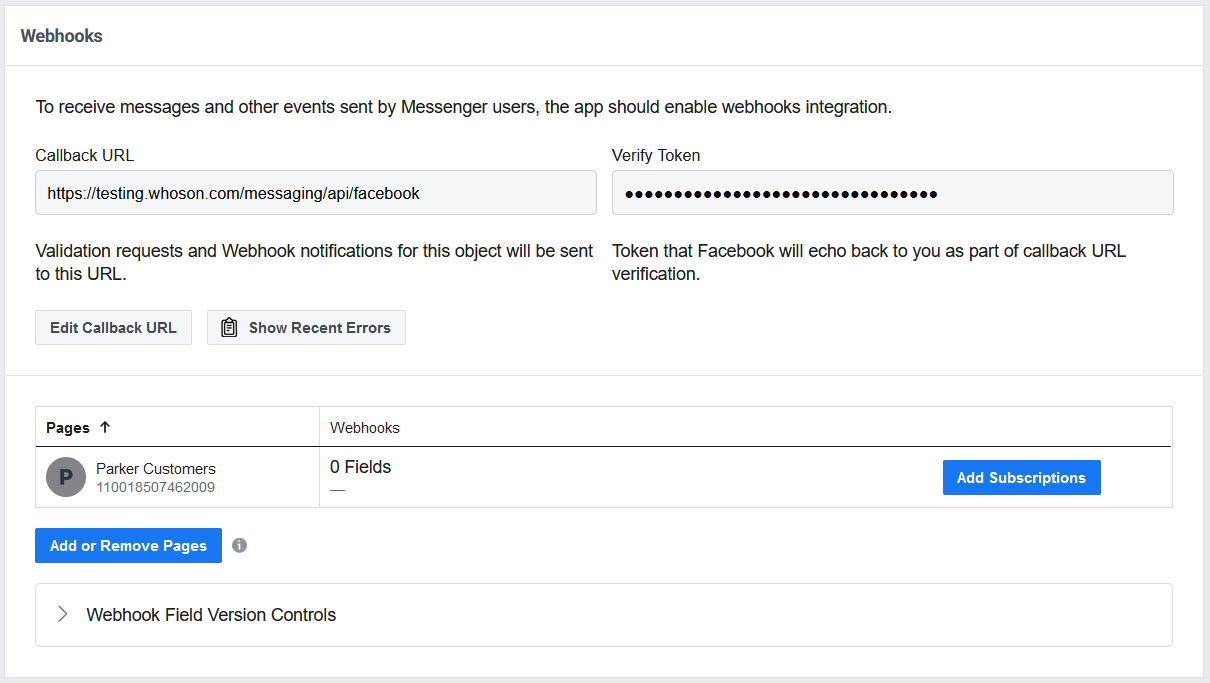
- Select Add Subscriptions for your page. settings.

- Enable the following subscription fields and save.
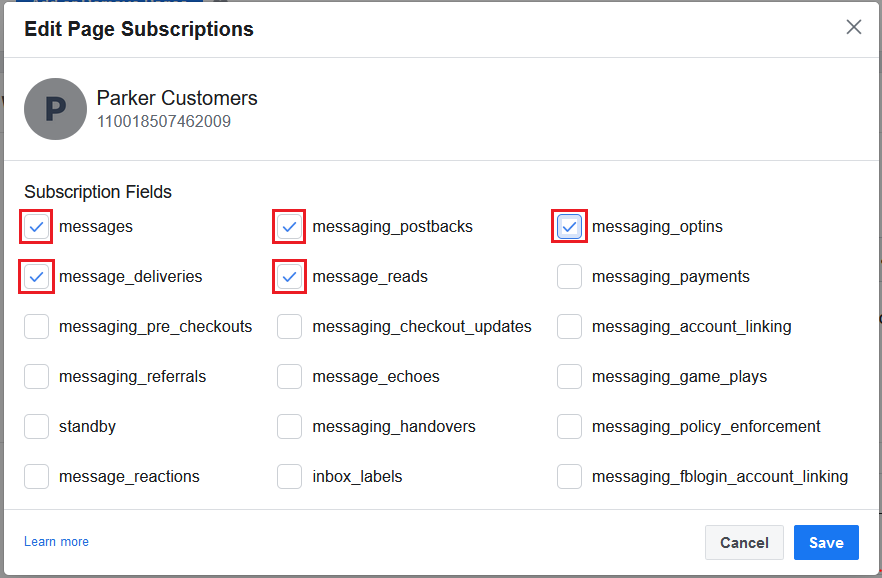
- You can now accept chats.
Configuring Microsoft Teams Integration
Requirements
- Microsoft Teams
- App Studio For more information see: https://docs.microsoft.com/en-us/microsoftteams/platform/concepts/build-and-test/app-studio-overview
- "Team Administrator" role to allow you to push the app out across your organisation
Create app in Microsoft Teams
- Navigate to Apps on the left
- Search for "Developer Portal"
- Click on "Developer Portal" and "Open"
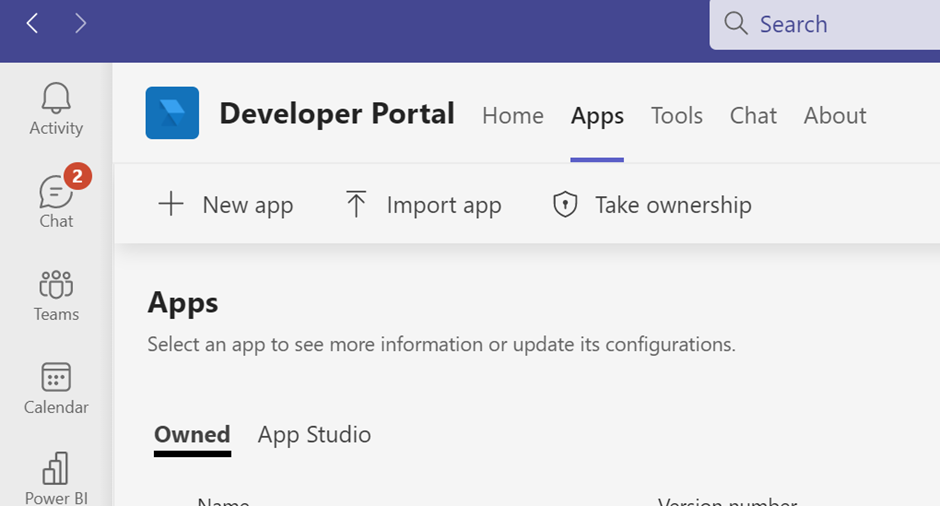
- Once opened, select "Tools"
- Click "Bot Management"
- Click "+ New Bot" on the top bar.
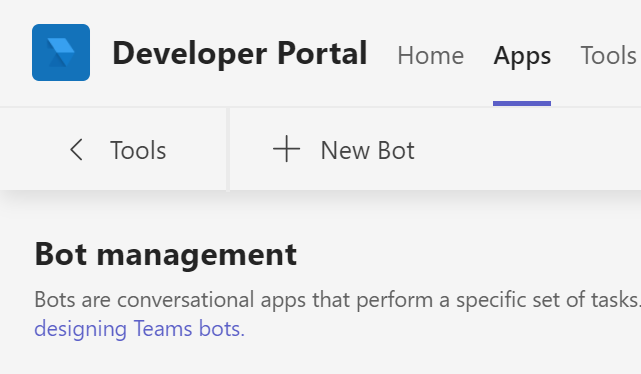
- Give the Bot a name and click Add
- In the Bot endpoint address, enter:
https://{server}/messaging/api/teams?site={domain}replacing {server} with the whoson server address and {domain} with the domain configured in WhosOn, for examplehttps://testing.whoson.com/messaging/api/teams?site=www.whosontest.com - You can click on the link to "Bot Framework Portal" to set the Bot's Icon.
- Click "< Bots" on the top left.
- Copy down the "Bot ID" for your bot.
- Now select "Apps" on the top bar
- Select "+ New app"
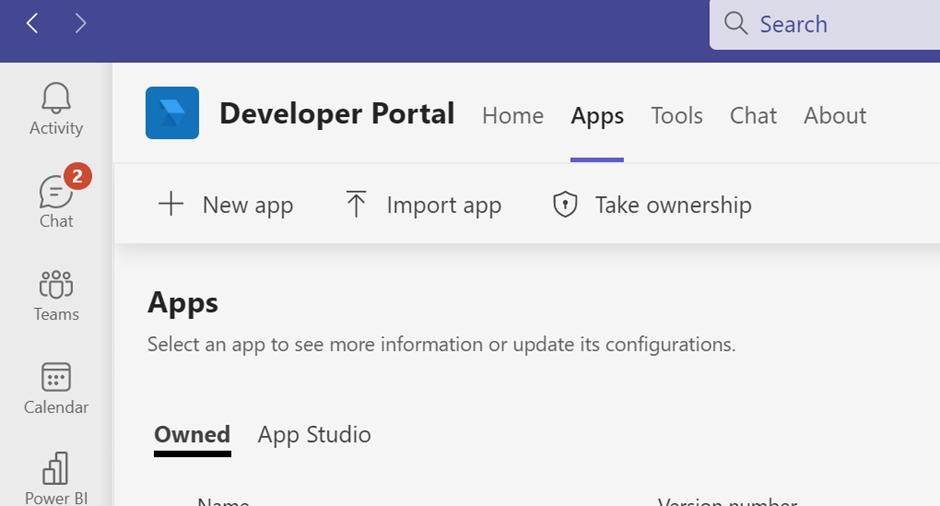
- Provide a "Name", you can use "WhosOn App" or "Service Desk"
- Click "Add" to generate an App ID.
- Fill in all the required fields
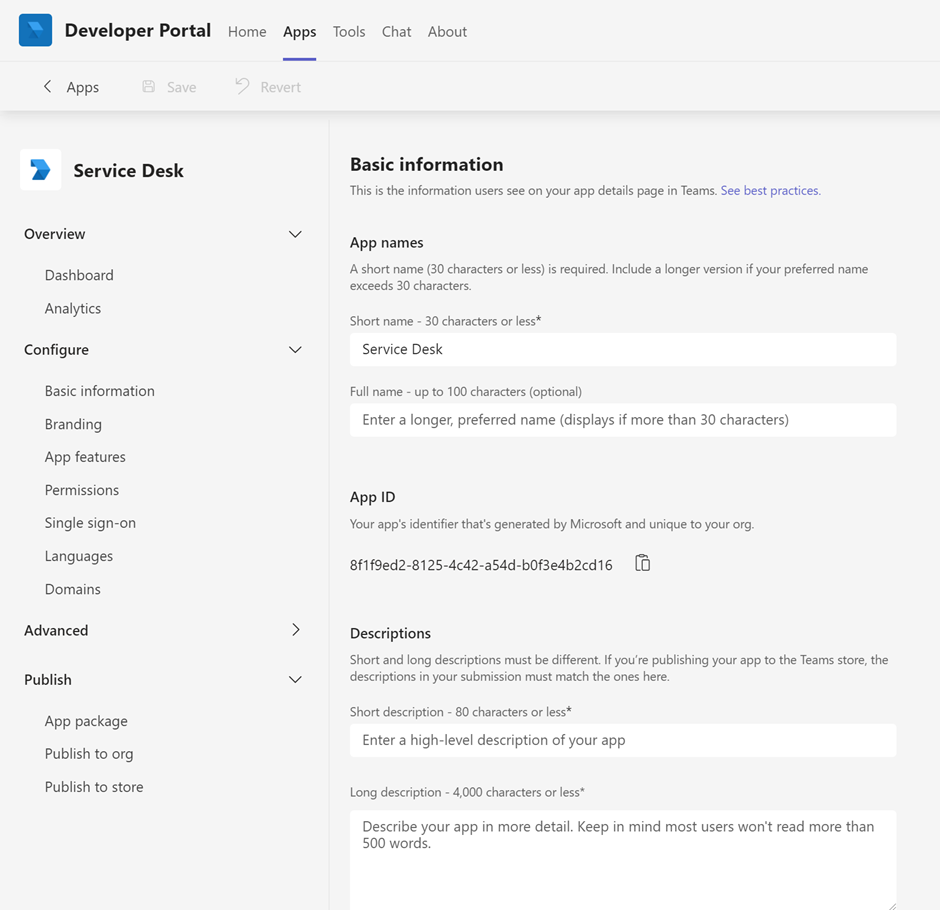
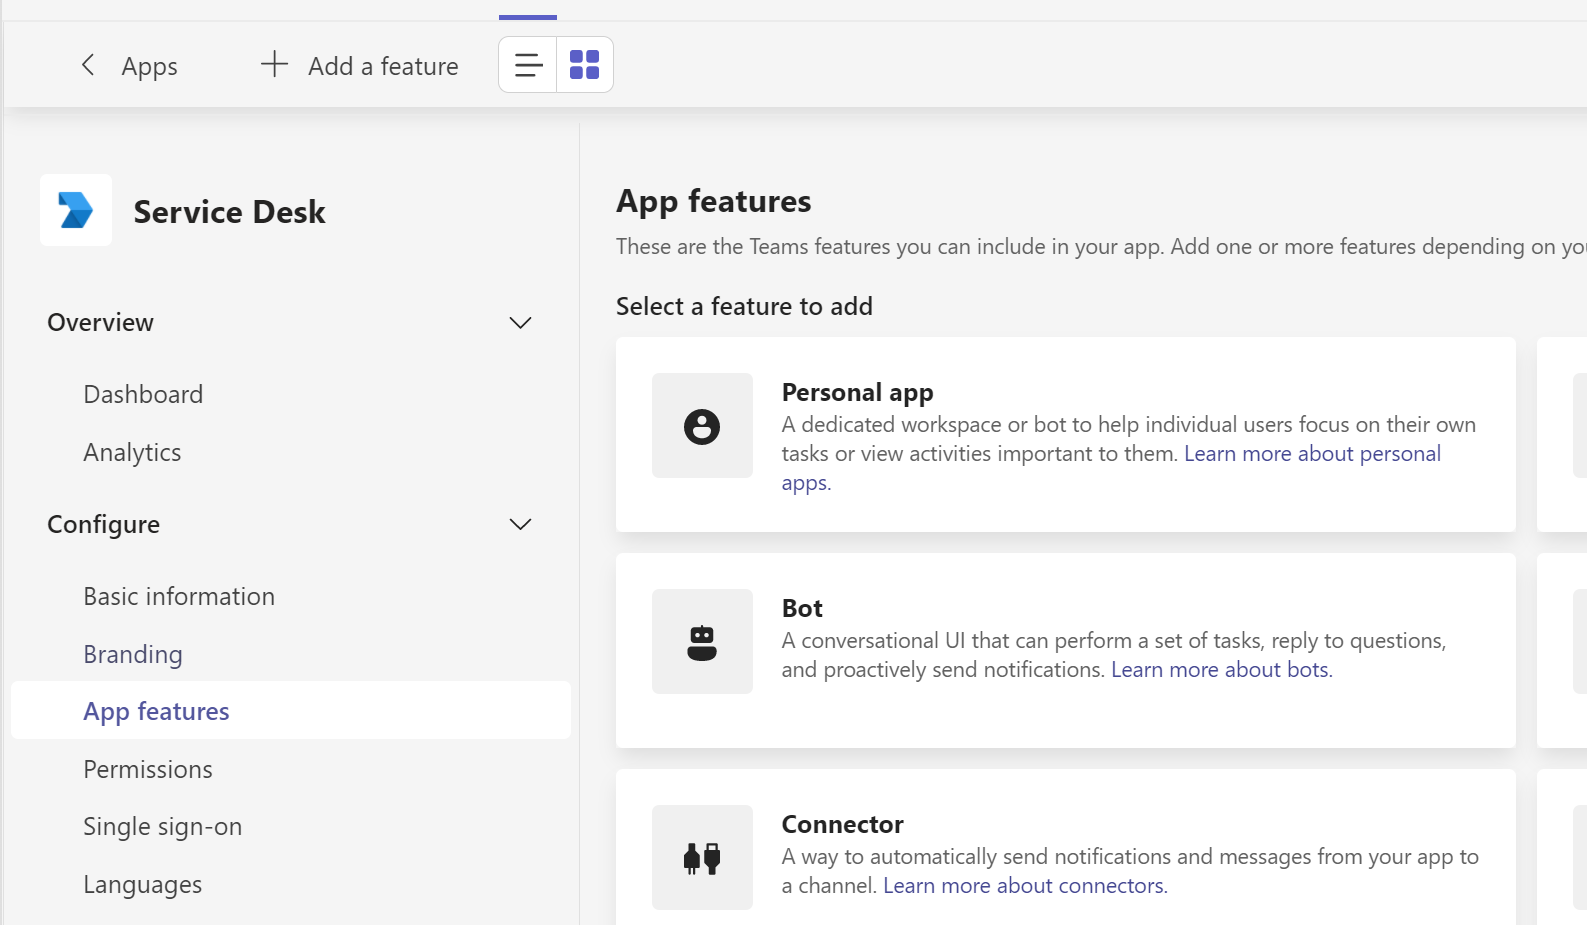
- Select "App features" then "Bot"
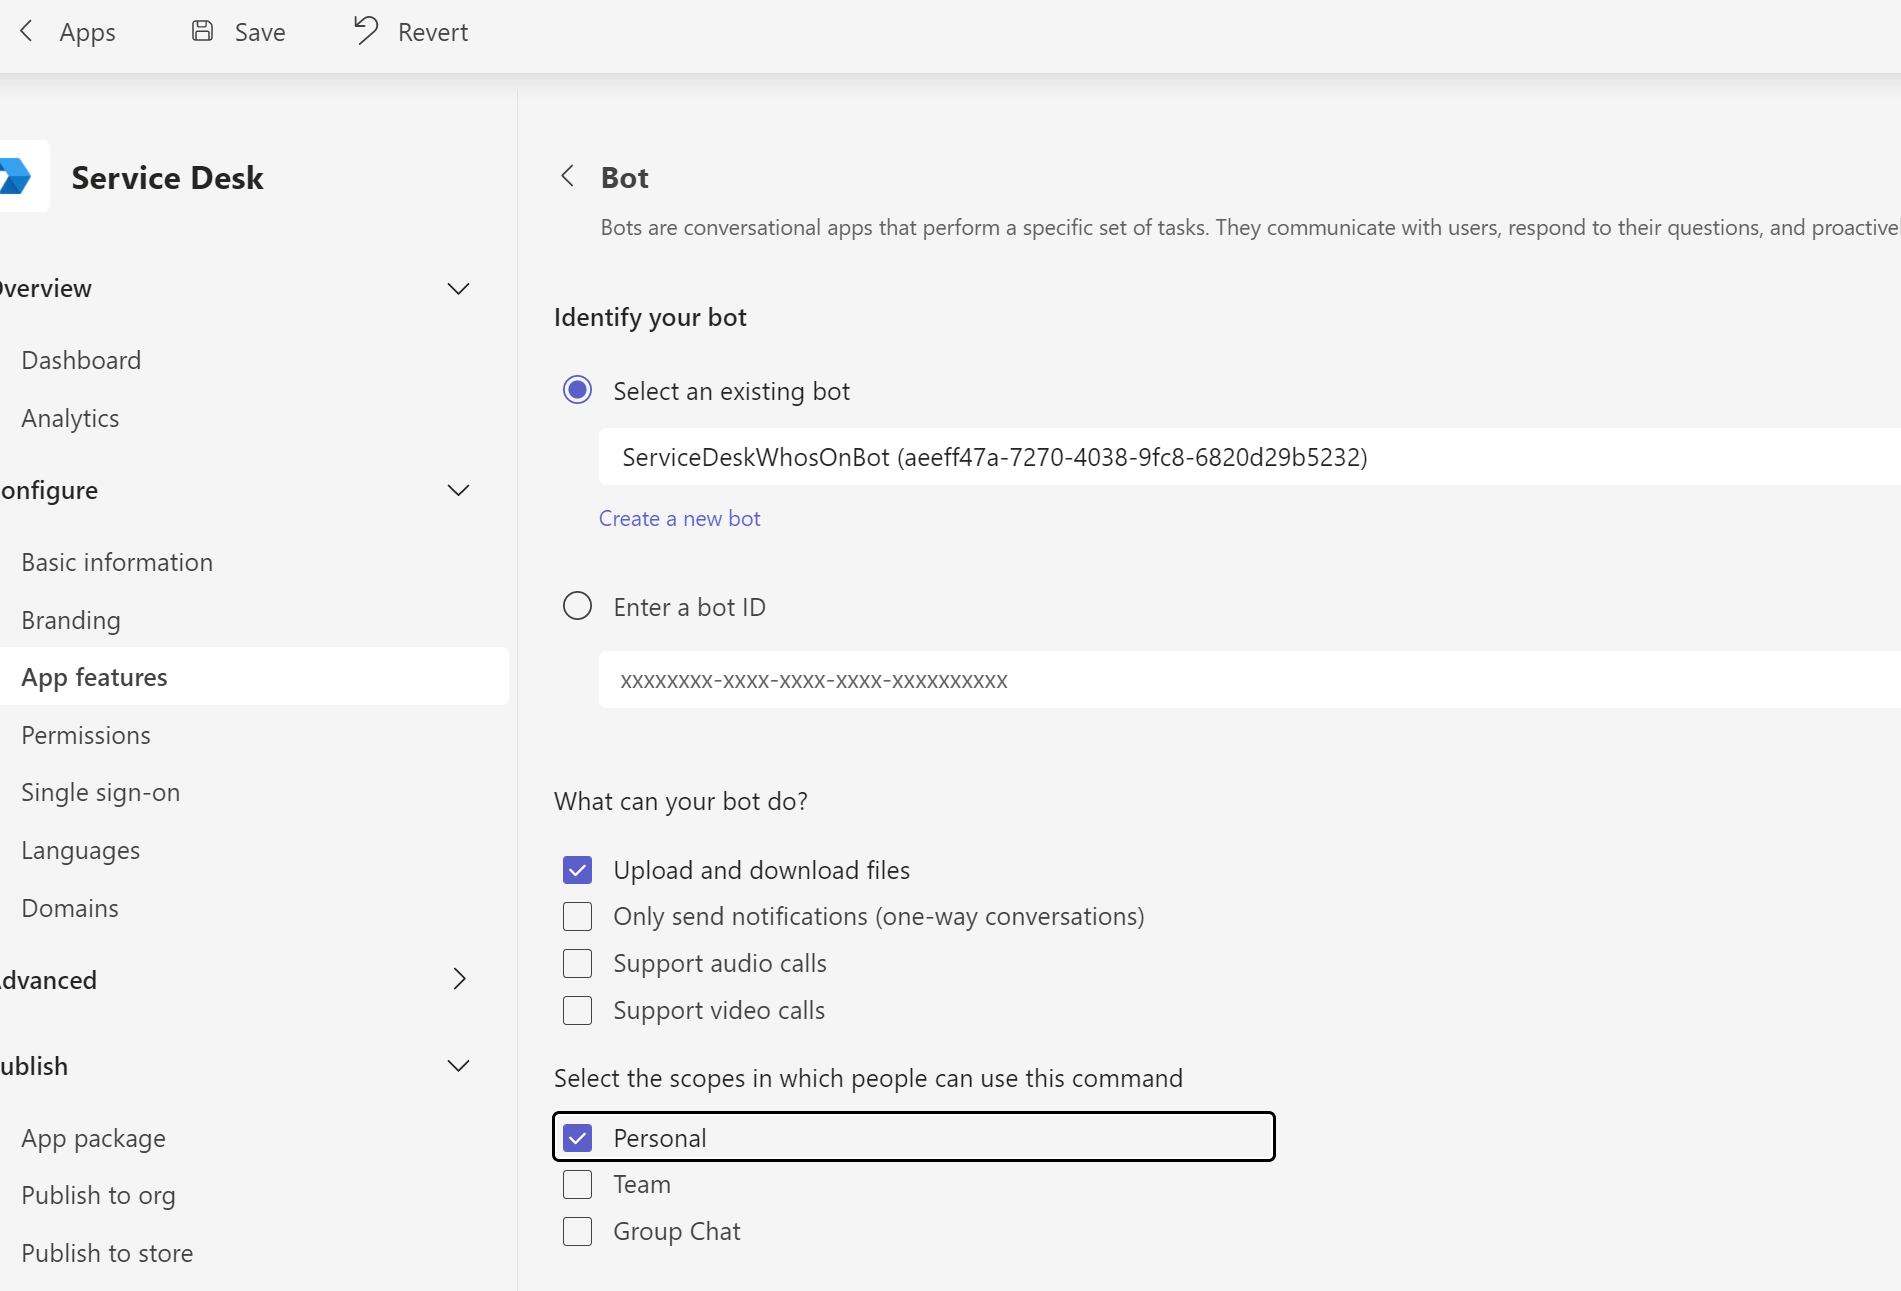
- From the existing bot dropdown, select your bot you created earlier.
- Ensuring that the following checkboxes are selected:
a. My bot supports uploading and downloading files
b. Personal
Connect Teams bot to WhosOn
- Access your settings portal
- Go to Advanced > Chat Channels
- Select "Microsoft Teams"
- In the settings portal, select "Enable" to enable channel.

- From the Microsoft Teams bot setting, copy the "Bot ID" and paste it into the WhosOn settings portal Bot ID field.

- From Microsoft Teams select "Generate Password" and copy the password to WhosOn settings portal.


- Copy the "Bot End Point" URL from the settings portal and paste it in Teams "Messaging Endpoint"

- In Teams, go to "Test and distribute".
- Select "Install" to install a local team instance for testing.
- Once finish testing you can "Publish" your app to your tenant's app catalog or the Teams app store.

Configuring HubSpot Integration
Requirements
- A Hubspot account
-
App Marketplace access or SuperAdmin access required
To set this go the former, go to Account -> Settings -
To configure HubSpot, select "Yes", and select connect.
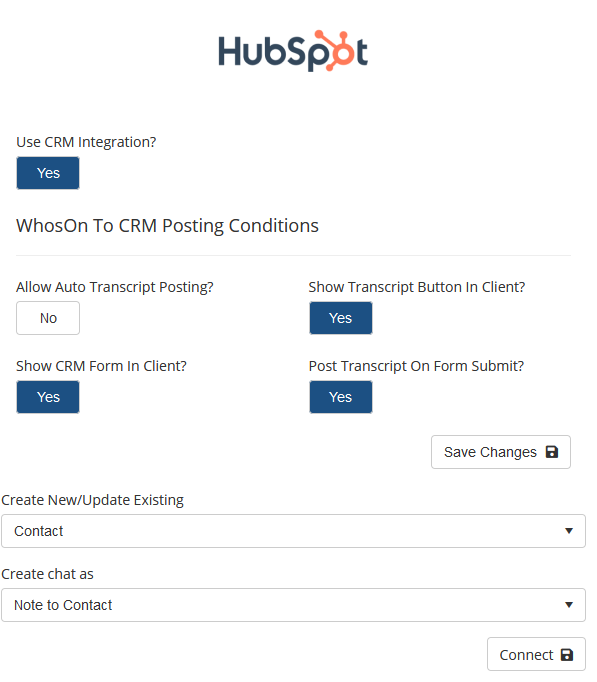
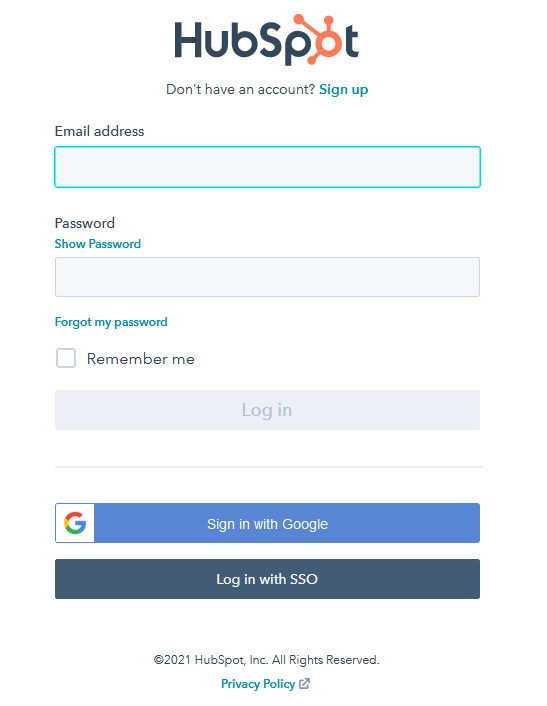
- Next you will be prompted to connect to your CRM environment. Enter your credentials and select login.
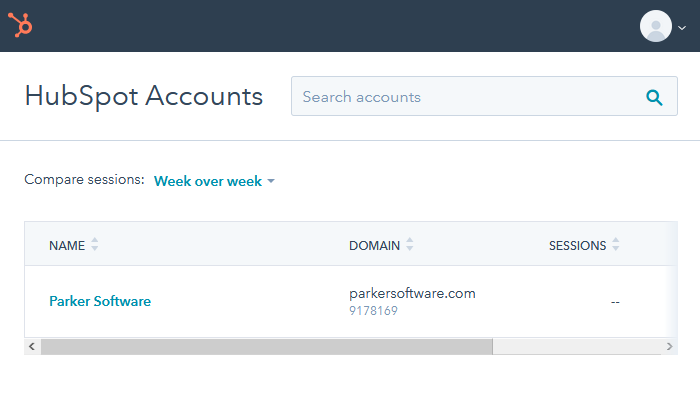
- Upon login, HubSpot will ask to select the account to use.
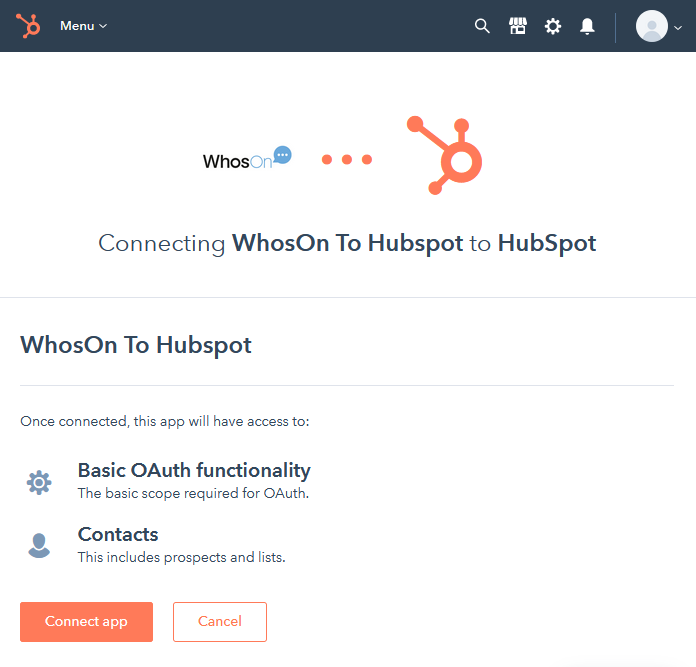
- Next connect WhosOn to HubSpot, by selecting "connect app".
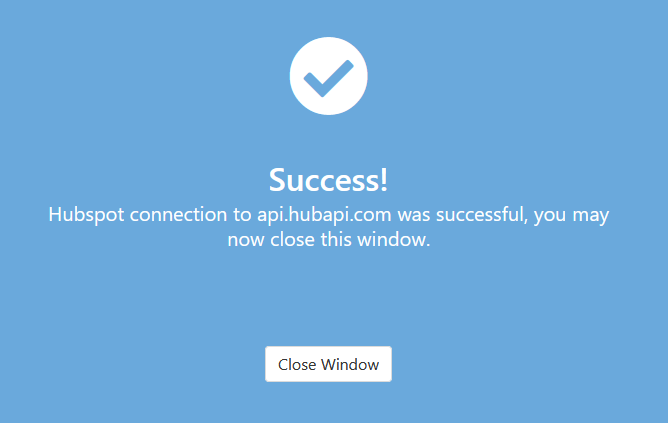
- Once there is a successful connection to HubSpot API, you will be presented with the success screen, as shown below.
Using HubSpot Integration
- To Use HubSpot, login to your client application
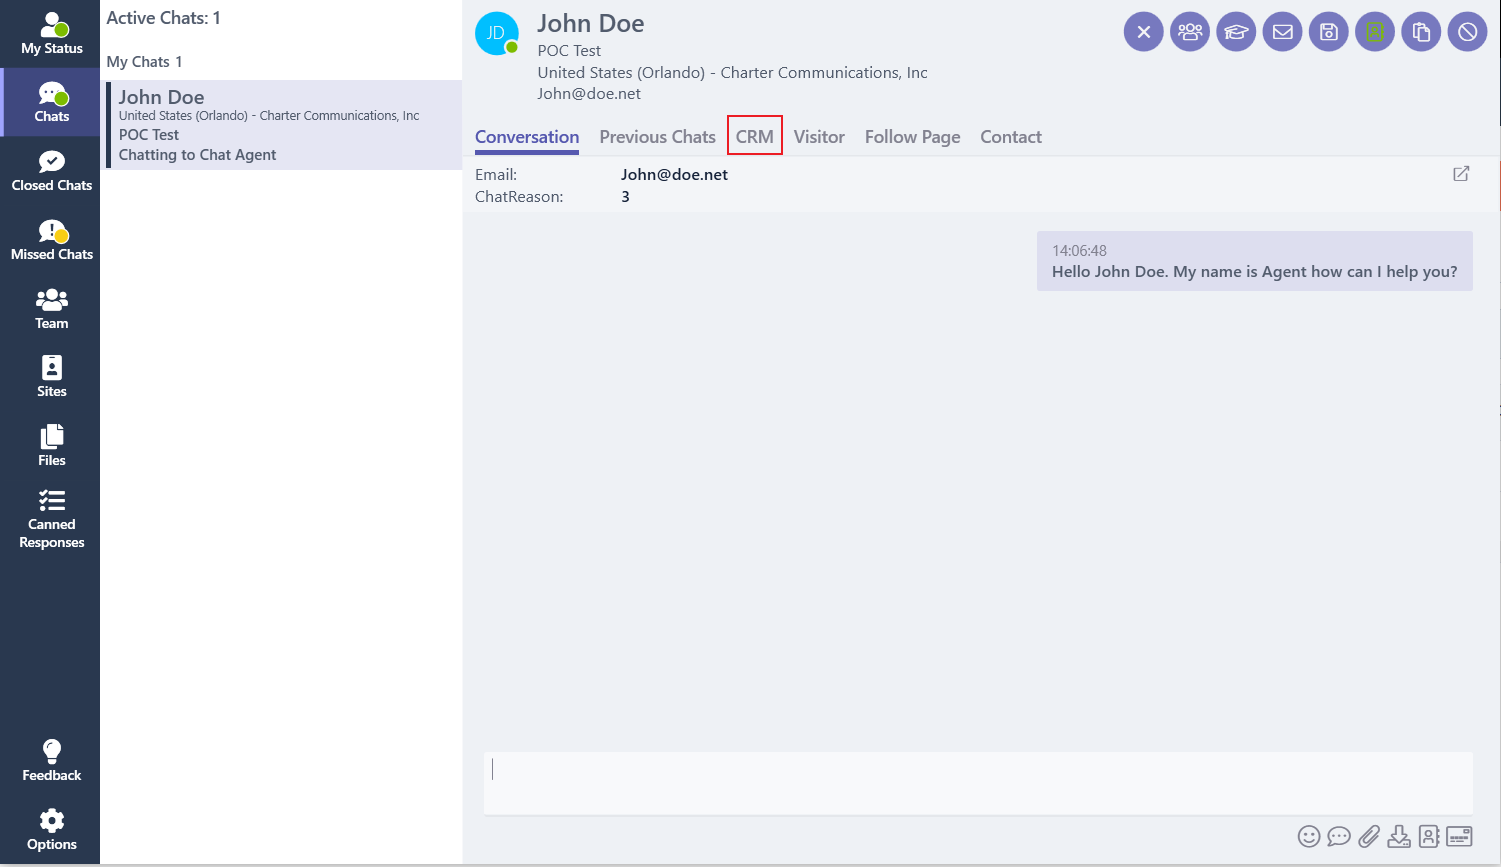
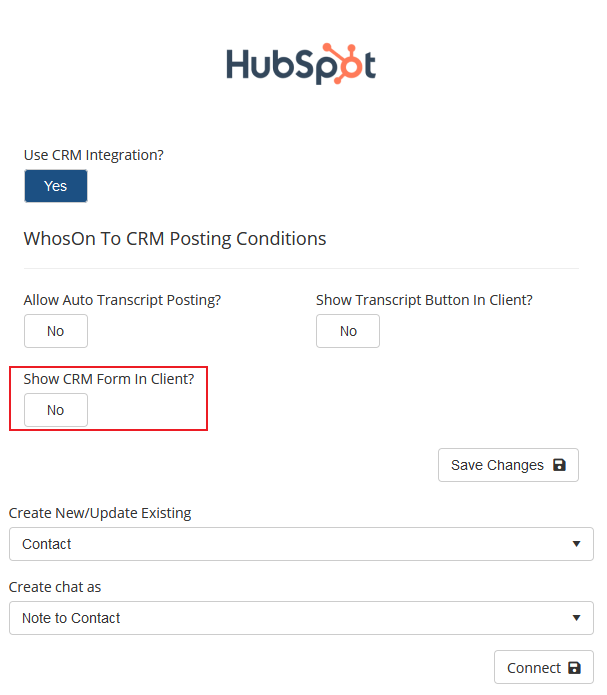
- During a chat, access the "CRM" tab. (only is available if "Show CRM form in Client" is enabled in the HubSpot Integration)
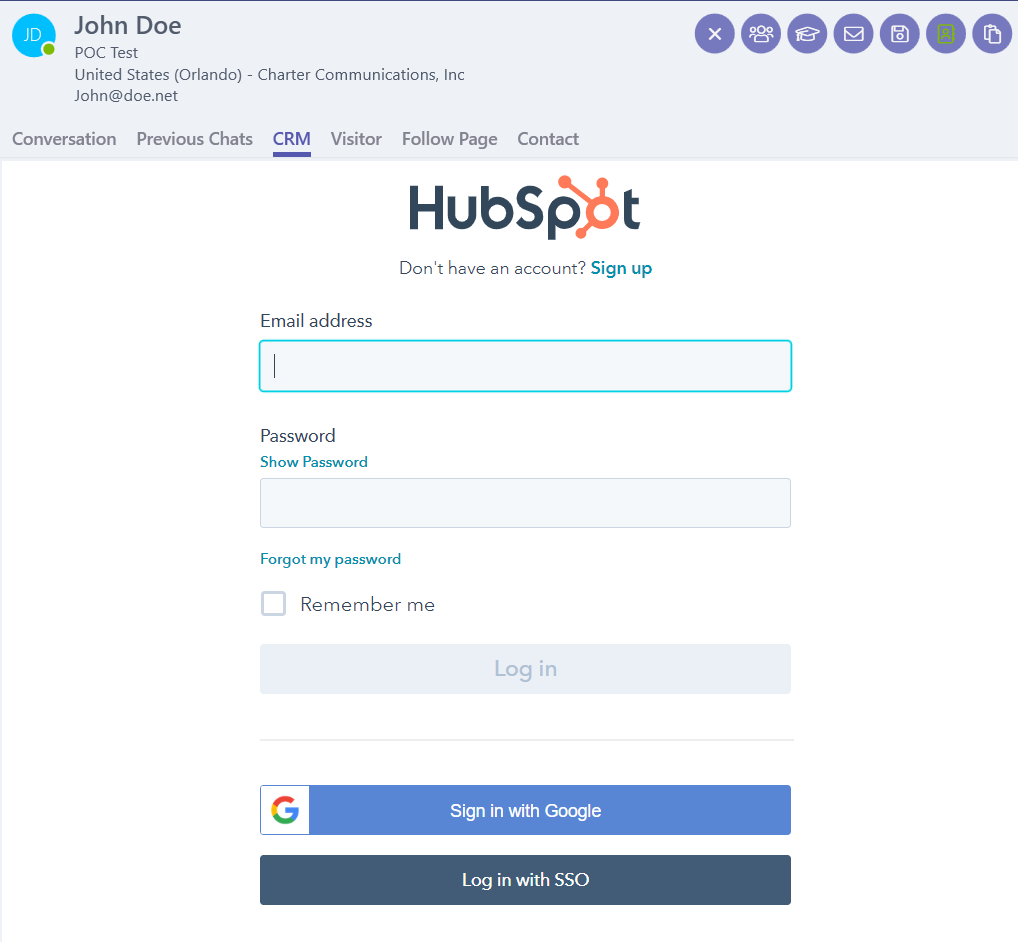
- Agents will now be prompted to login with HubSpot CRM credentials.
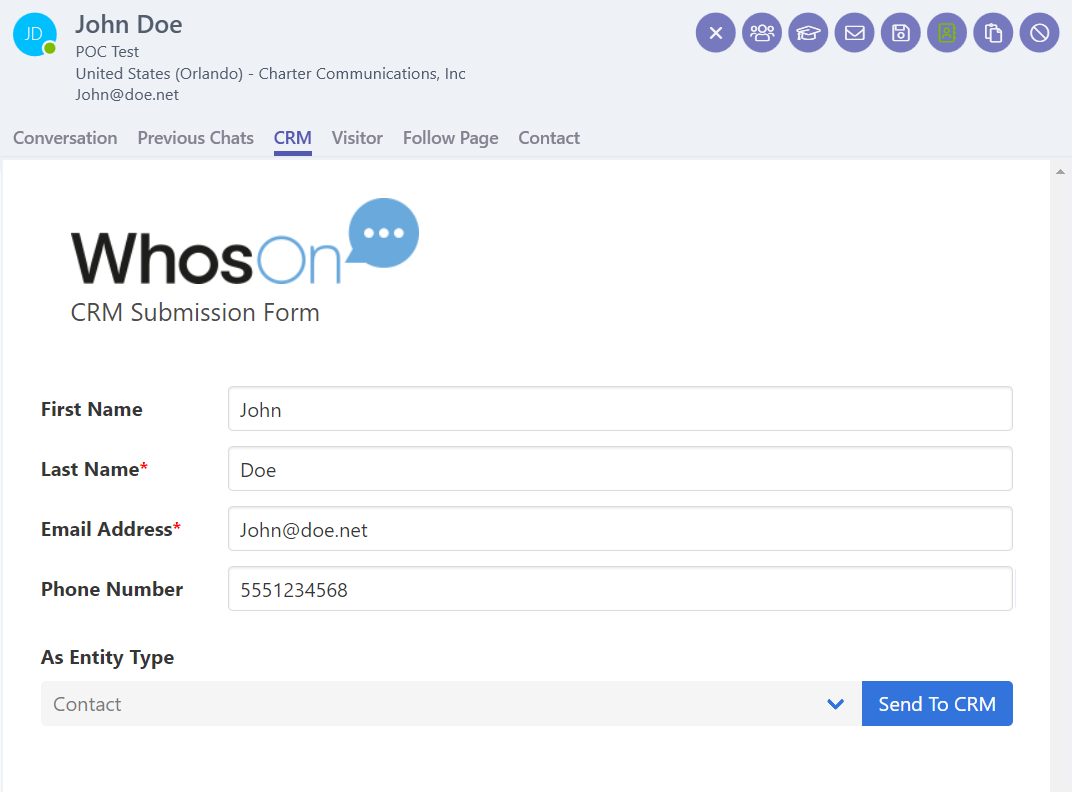
- Select the HubSpot account to connect to.

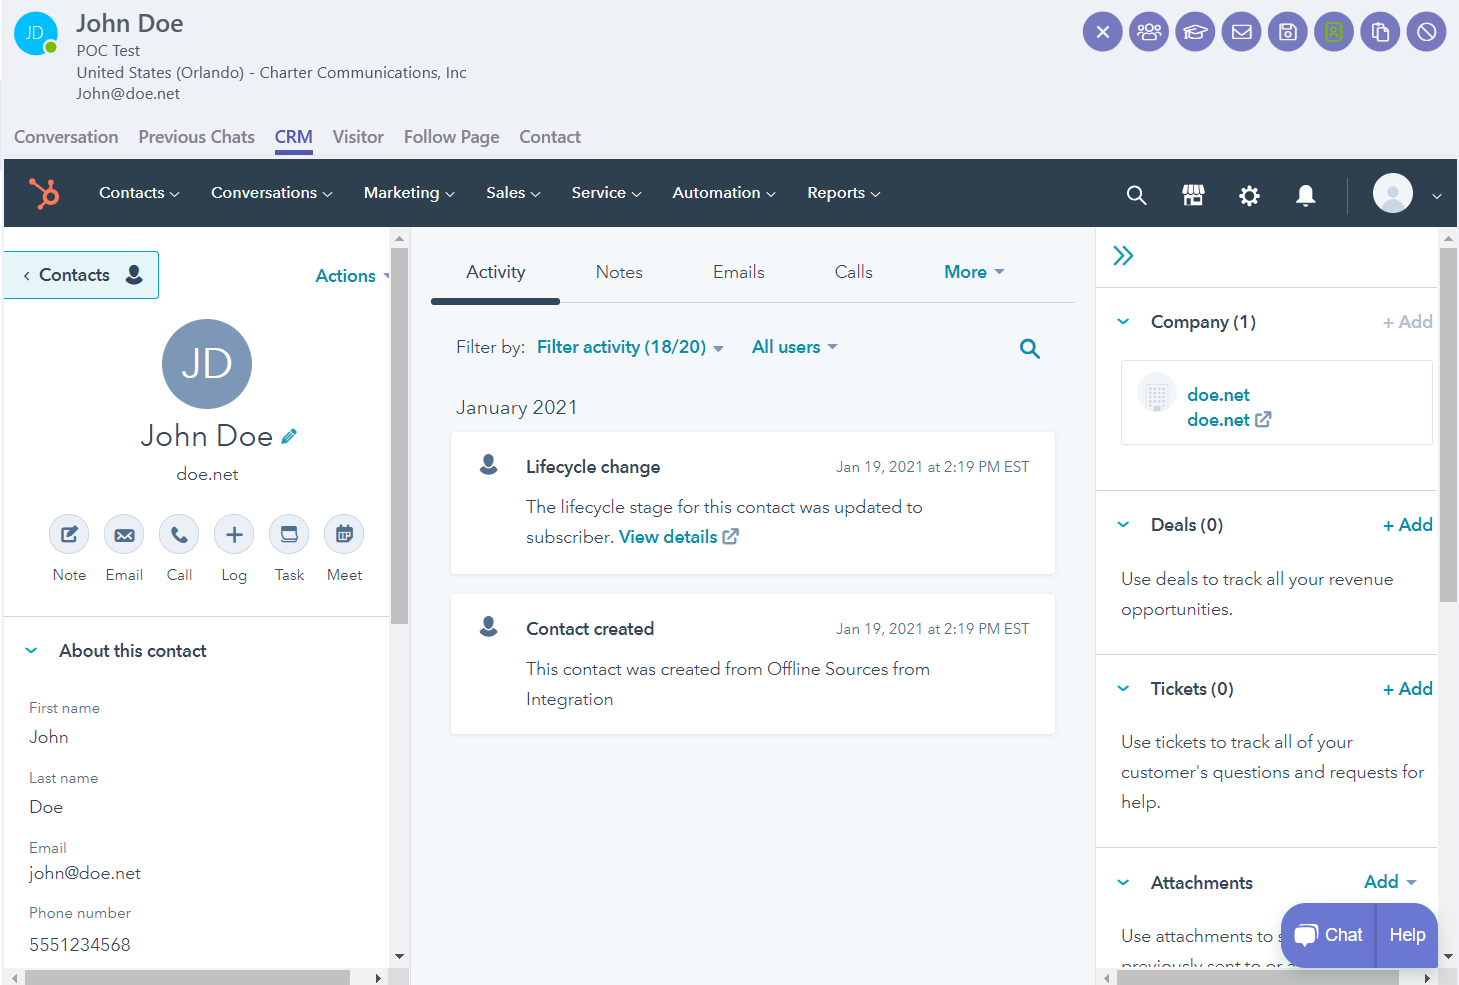
- The CRM tab will now display a submission form, to send the contact to HubSpot as a contact. Complete the form and submit.
- A success window will appear, giving the option to view the newly submitted contact.
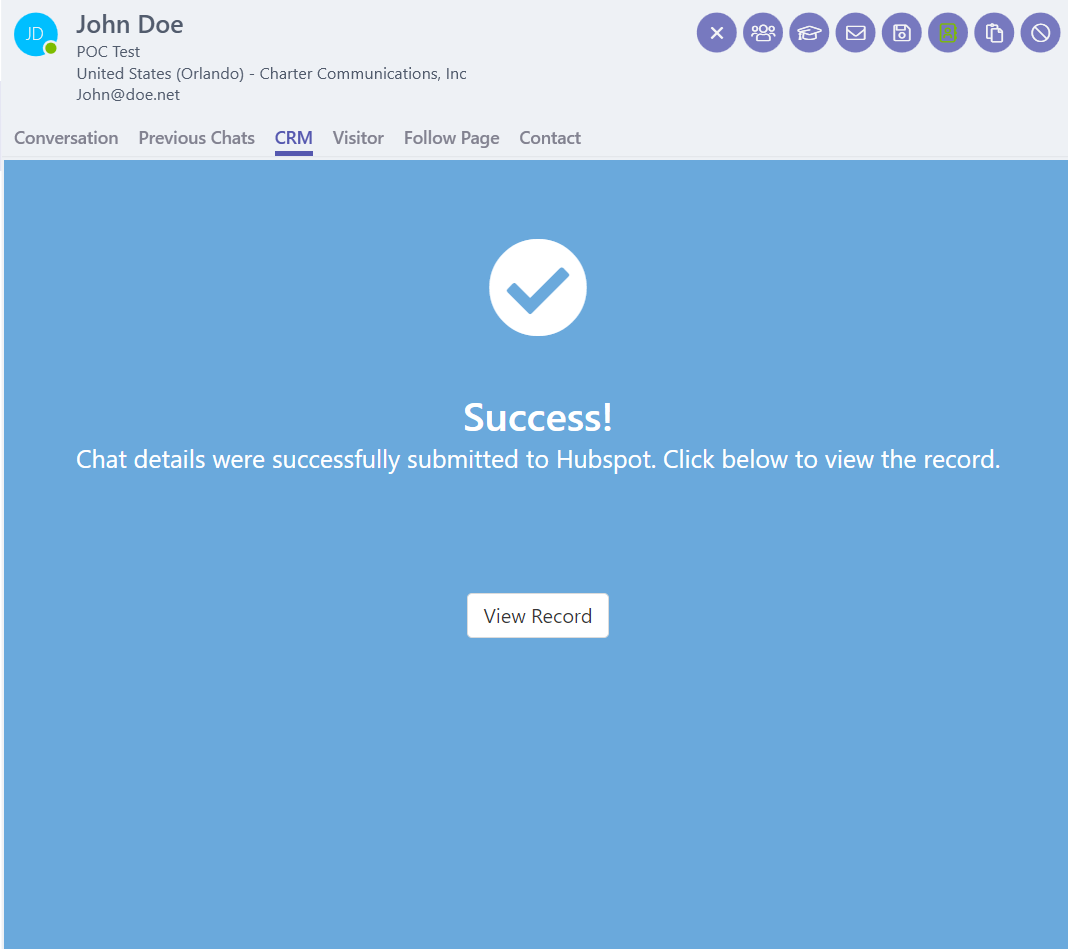
- The agent will be able to view the contact record, within the client by selecting "view record", or login directly into HubSpot.
Saving Chats to HubSpot
- Agents will still have the ability to save chats to Hubspot, if the option to "Show CRM Form In Client" is not enabled in the Hubspot integration.
- Agents has the option to save their chats to HubSpot by selecting "Save this chat to CRM" at the top right corner of the client. Chats will be saved after the chat ends.

- Once the chat is completed, the chat record will be saved in HubSpot as a note under the contact record.
Configuring Braintree Integration
-
A Braintree account
-
Enable Braintree and copy your Braintree Merchant ID, Public and Private Key from your Braintree Account.
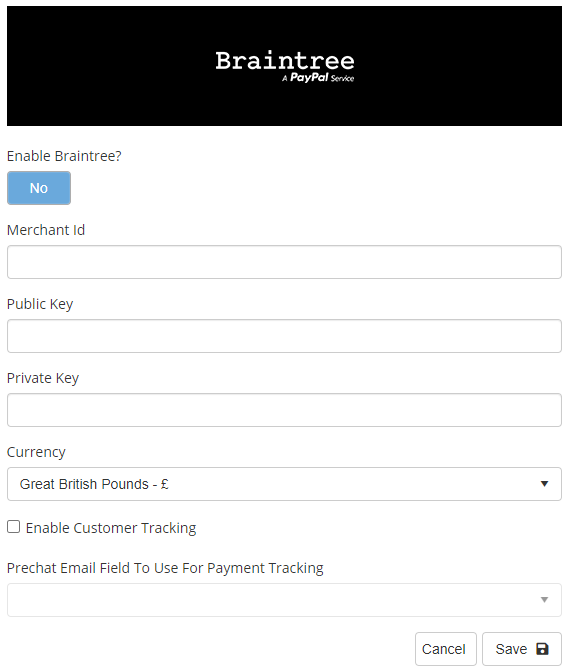
- Select your Currency.
- Select an Email Survey Field for Payment Tracking, if one is configured.
- Select Save.
Using Braintree Integration
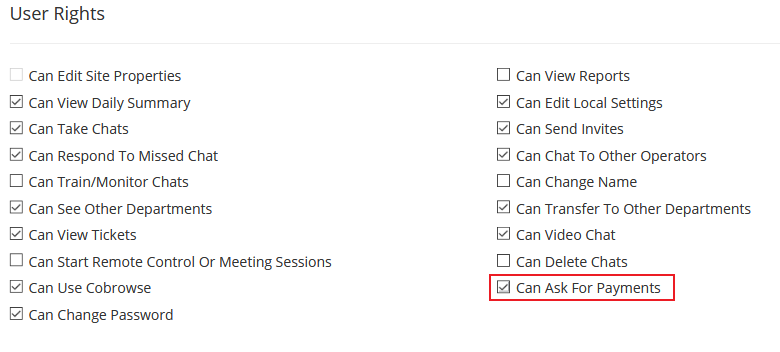
- After Braintree has been configured in the Settings Portal, ensure users have the permission "Can Ask For Payments".
- each chat agent will be presented with an option "Request Payment", at the bottom right of a chat.

- Select Request Payment, and enter a Description, Amount, and Reference number.

- Next select "Request"
- A chatline will appear in the agent's chat with the details entered above.

- The visitor will now be presented with a payment option within the chat window.
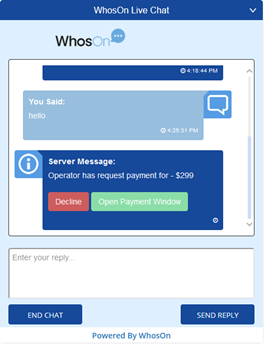
- The visitor has the option to Decline payment or to Open Payment Window.
- If the visitor decline payment, a decline payment message will be presented to the chat agent.

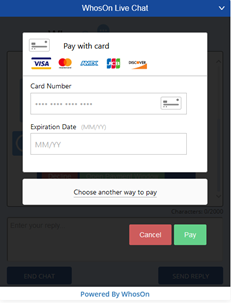
- If the visitor wants to accept payment, they will open payment window to enter their credit card details.
Configuring Real Time Translation
Requirements
-
A translation service subscription with Parker Software, for more information please visit: https://www.whoson.com/translation/
-
Enable Real Time Translation

- Enter your translation username and password (contact sales and request an account)
- Select "Verify Account Details" to validate credentials
- Select Save
Using Realtime Translation
- Ensure the "Default Operator Language" is set to the native language for all operators.

- Navigate to Chat Designer > Chat Languages

- Ensure "Default UI Language" is set to "Visitors Language"
Configuring Upscope
Requirements
-
An Upscope licence purchased through Parker Software
-
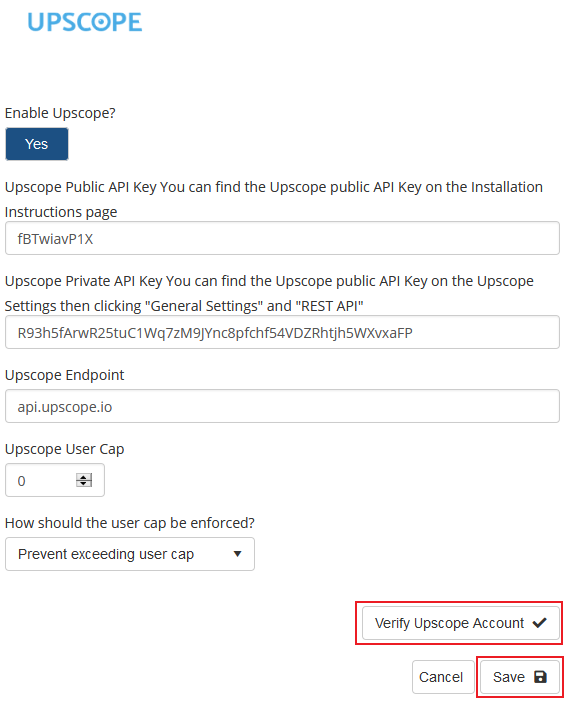
Access your settings portal
- Navigate to Integrations
- Select "UPSCOPE"
- Select "Yes" On Enabling Upscope?
- Enter both "public" and "private" API key. (Request these API key from WhosOn Customer Service)
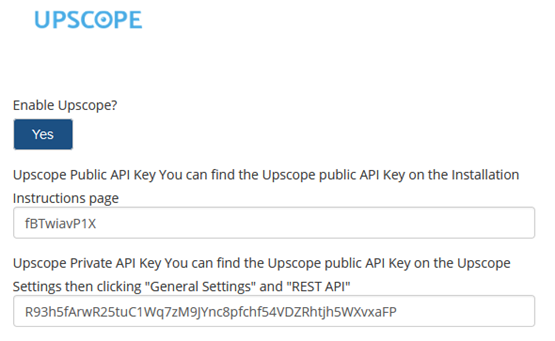
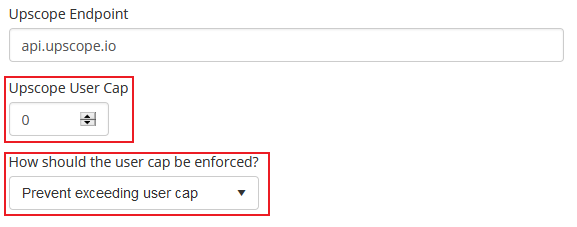
- Set the Upscope Endpoint to "api.upscope.io"
- Set a User Cap and how the user cap will be enforced.
- Verify Upscope Account and Save
Using Upscope
In order to prevent secure fields from showing through in to Upscope, you can add a css class.
This works on any input type and replaces it with a * on the operator side.
The css class to add is: no-upscope
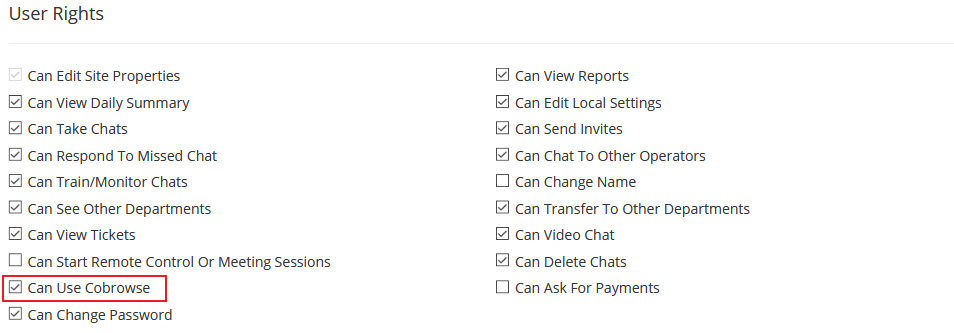
- Ensure the user(s) that will be utilizing the Upscope feature has the permission enable on their WhosOn user account.
- Login to the WhosOn Client
- During chats, the cobrowse option will be available for each chat.

- Select Cowbrowse and a new popout window will appear.
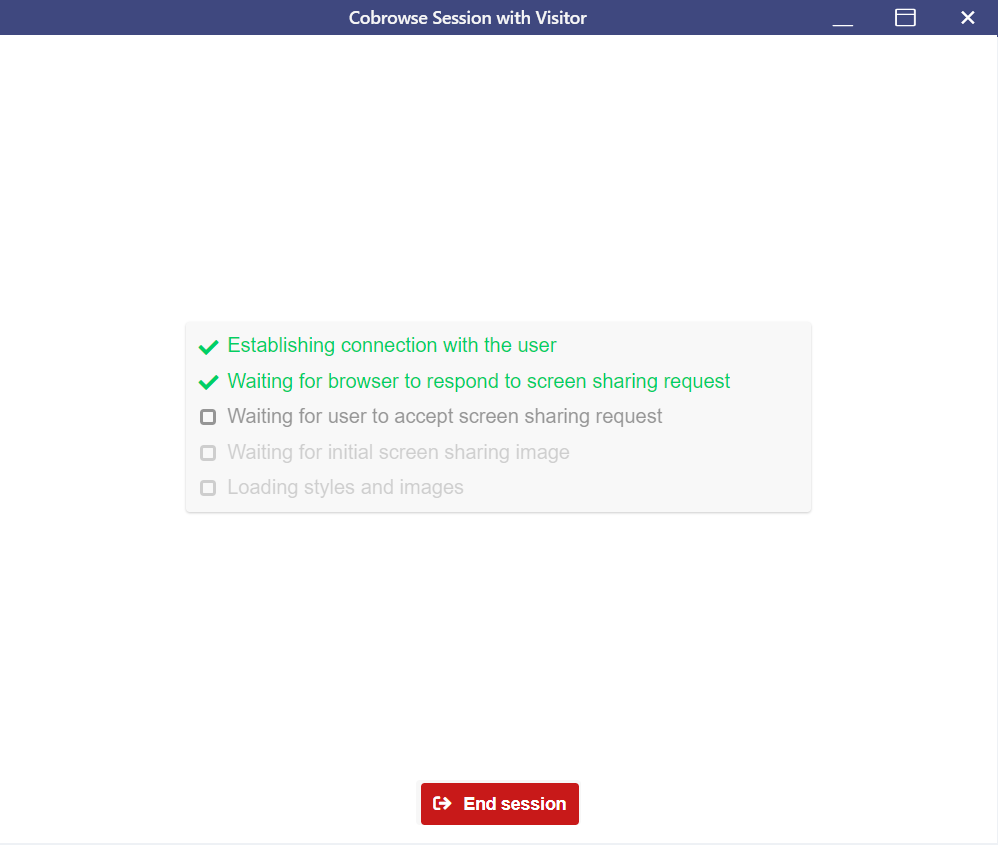
- Depending on your Upscope configuration, the visitor will be presented with a cowbrowse approval screen.

- One the visitor accepts the screensharing, the agent will now be able to see the visitor's screen.
Upscope cookies:
These cookies are used by Upscope to support the co-browse feature and will be present for visitors to your website if you have enabled Upscope.
_upscope__shortId, it contains the ID of the user
_upscope__region, it contains which region we should connect to
_upscope__waitingForCallAt it contains the date the user was last requesting a cobrowse
_upscope:uniqueConnectionId is in sessionStorage, and it's a uniqueId set for each window.
_upscope:connectionActiveSince is in sessionStorage, and it's the time the visitor went to the site. This is to determine the order of visitors to show on the visitors list.
apex_test to determine what the root domain is, but this is being removed
Microsoft Dynamics Integration
Requirements
-
A Microsoft Dynamics account that has the web services available from the WhosOn server and user locations.
-
Access Microsoft Dynamics Integration from the WhosOn Settings portal

- Select Microsoft Dynamics

- Select Enable to use MS Dynamics
- Enter the URL of Dynamics Environment

- Choose the conditions and options suitable for your organization
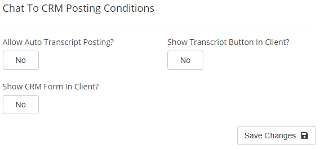
- Select Connect

- You will be prompt to sign in using your Microsoft Dynamics credentials
- Select Login and a successful message will appear.
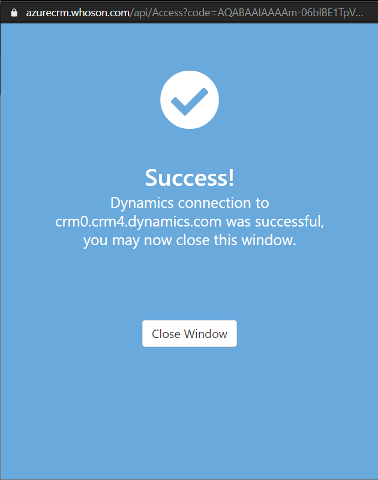
Salesforce Integration
Requirements
-
A Salesforce account with access to Salesforce's "Web Services API".
-
Access Salesforce Integration from the WhosOn Settings portal

- Select Salesforce
- Select Enable to Salesforce
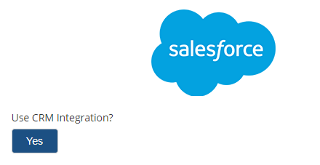
- Enter the URL of your Salesforce Environment

- Chose the conditions and options suitable for your organization
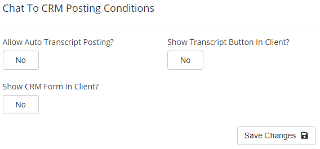
- Select Connect

- You will be prompt to sign in using your Salesforce credentials
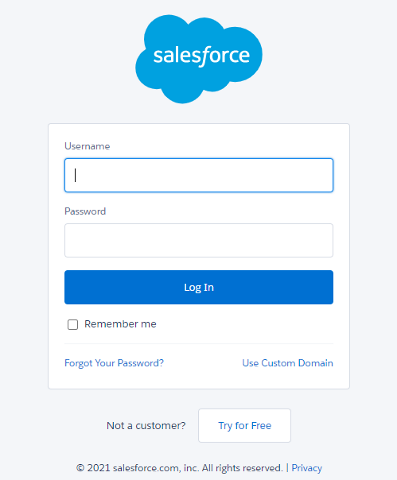
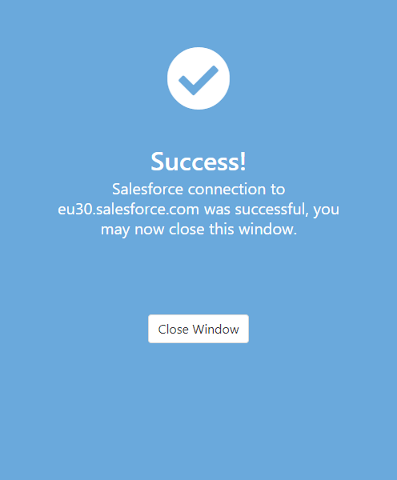
- Select Login and a successful message will appear.
SugarCRM Integration
Requirements
-
A SugarCRM account
-
Access SugarCRM Integration from the WhosOn Settings portal

- Select SugarCRM
- Select Enable to SugarCRM
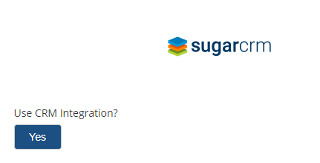
- Enter the URL of SugarCRM Environment

- Chose the conditions suitable for your organization
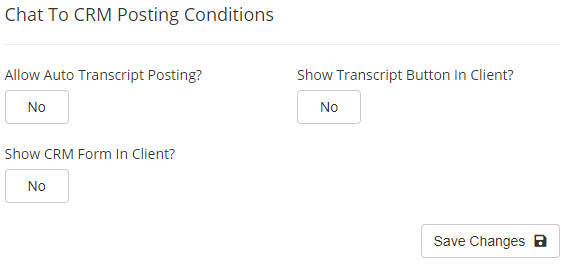
- Enter your ClientId and Client Secret

- Select Connect

- You will be prompt to sign in using your SugarCRM credentials
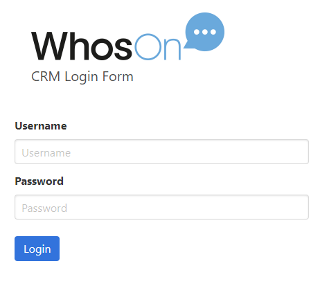
- Select Login and a successful message will appear.
How to use CRM in the Client
Requirements
-
To have one of the above CRM options configured in the Settings Portal
-
During a chat select the "CRM" tab to access the CRM submission form.

- Enter/Update the contact information
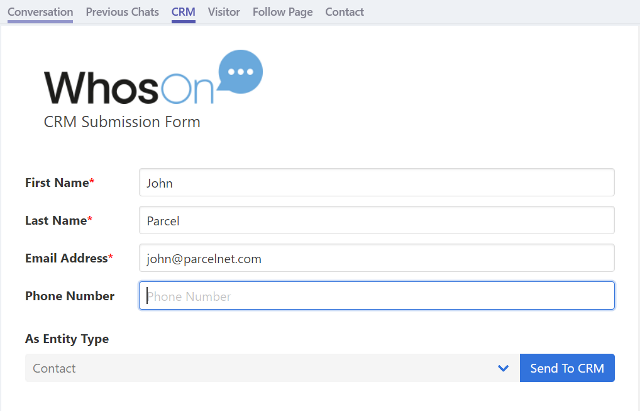
- Select "Send to CRM"
- When the details have been successfully passed to Microsoft dynamics, you can view the record directly from within WhosOn.
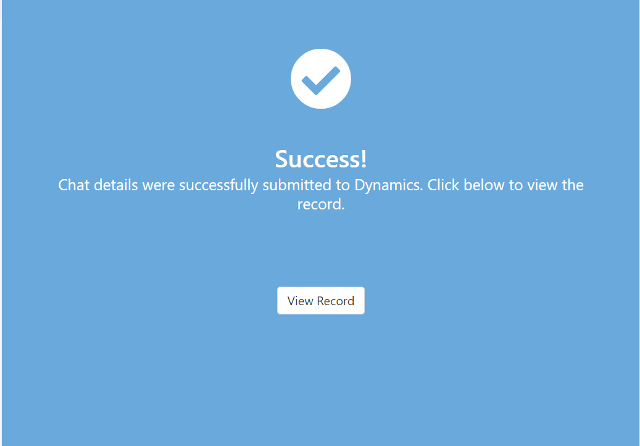
Fastviewer
Requirements
- A FastViewer licence purchased through Parker Software
The Fastviewer feature allows WhosOn operators to view visitor's screens and control them.
Starting a remote session
Fastviewer remote sessions can be started from the Modern Client when in an active chat. To begin, click the Start A Remote Control Session button (located in the upper right corner of the client when in an active chat).

Clicking this button will show the following prompt:
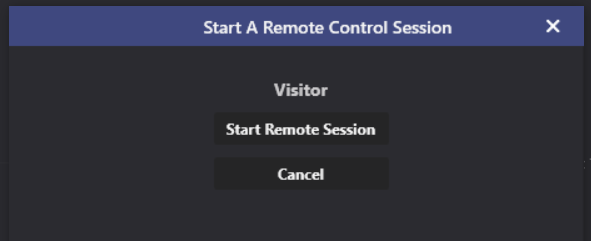
Clicking Start Remote Session will download the Fastviewer client to your PC. Once downloaded, a link will automatically be sent to the visitor prompting them to download the Fastviewer client also. The client will show as an .exe file to the visitor.
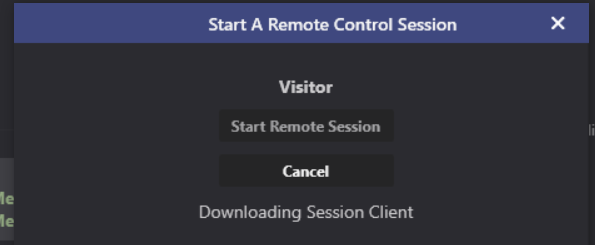
Once both parties have the Fastviewer clients open, the remote session can begin.
In the remote session
This section details the operator and visitor views
Visitor View
Once the visitor has started the Fastviewer client, they will be prompted to allow access to the operator to view their screen, and also take control of their PC.
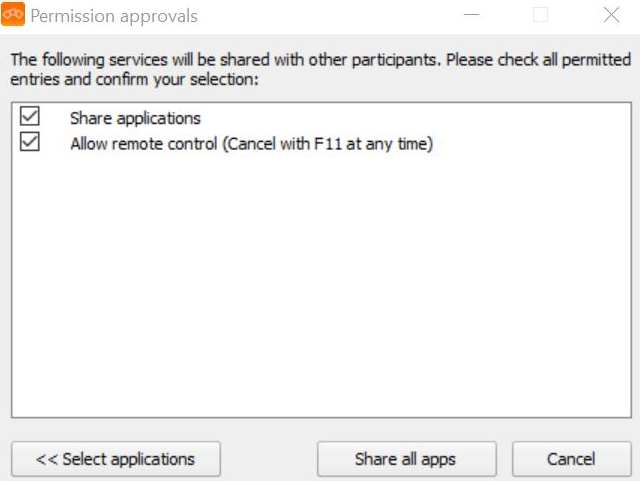
After approving control, the visitor will see a sidebar on the left side of their screen. This allows them to cancel the screenshare at any time, as well as expand out additional options in the Fastviewer menu:


Note, the operator cannot take control of the visitor's PC unless they explicitly allow access via the above permission window.
Operator view and remote session options
Once the visitor has started the Fastviewer client, the remote session will begin. The operator will then see a similar sidebar to the visitor. This sidebar shows info about the current session, allows the operator to specify a password, lets the operator share their own screen and more.
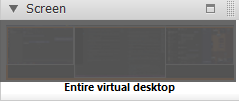
Screen
This drop down area allows the operator to select a screen to share (if they are sharing screens).
Chat
The chat drop down tab allows the visitor and operator to chat with each other.
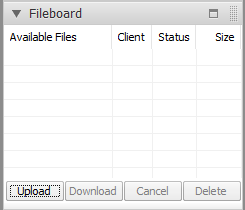
Fileboard
The fileboard menu allows the operator and visitor to exchange files.
To upload a file, click the Upload button and select a file. The recipient will need to click Download to receive the file on their end.
Audio
The audio menu allows the visitor and operator to communicate using connected microphone and speaker, allowing for audio communication. The operator can set the volume of their microphone and speaker here, as well as mute themselves and disable or enable voice communication.
Log
The log will detail events during the remote session, such as new attendees, permission grants etc.
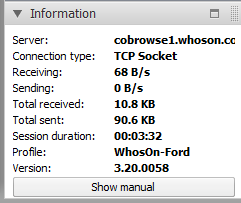
Information
The information tab will show info regarding the current active remote session.
Stopping the session
Either the visitor or operator can stop the remote session at any time using the Stop button. This button is located in the sidebar.

Twilio (Omnichannel)
Requirements
- A Twilio account Twilio
- Enable WebSocket Interface on the WhosOn server, in WhosOn Service Manager -> server Settings -> Chat Server -> "Enable WebSocket Interface (For Developer API)" - Leave the Secure option unchecked.
Phone Number
In Twilio, follow the below steps to create a number with the correct settings:
- Login and navigate to the Phone Numbers > Manage Numbers > Active Numbers area: https://www.twilio.com/console/phone-numbers/incoming
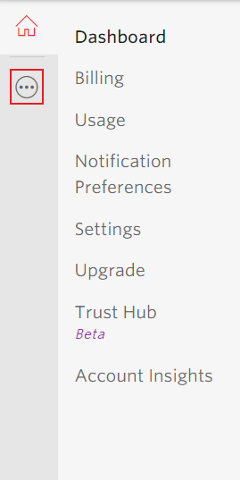
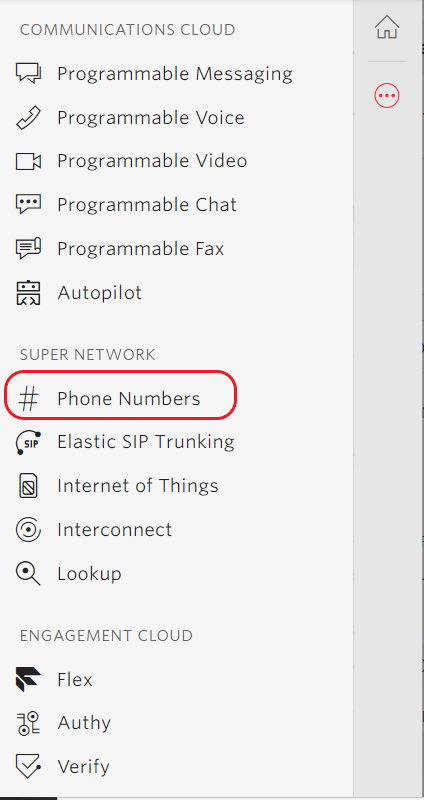
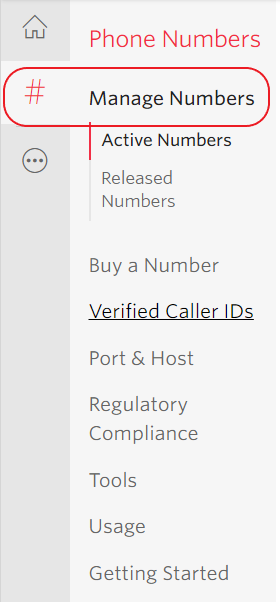
- If there is an existing number that can be dedicated to WhosOn then that can be used, alternatively a new number will need to be purchased
- Select Buy a Number and setup the fields accordingly

- Select the relevant Country
- There are no requirements for the Number
- Capabilities should include SMS but does not require Voice or MMS (if available in the chosen country)
- Select the search button and purchase one of the returned numbers

- Allow the newly purchased number to appear in the list of Active Numbers
- Select Buy a Number and setup the fields accordingly
- With a number selected (either new or existing) update the Friendly Name to something meaningful and make a note of the Phone Number.


Configure Webhook
- Access the active phone number configured for WhosOn SMS

- Scroll down to the " Messaging" section, and set the webhook for " A message come in" to https://{server address}/messaging/api/whatsapp?site={Site Domain} e.g. https://chat.whoson.com/messaging/api/whatsapp?site=www.whoson.com
- Next set the Webhook method for incoming messages URL should be set to HTTP Post

SMS Integration
Requirements
Please note a Twilio account is required to proceed. For more information visit Twilio
Configure Webhook
- Access the active phone number configured for WhosOn SMS

- Scroll down to the " Messaging" section, and set the webhook for " A message come in" to https://{server address}/messaging/api/sms?site={Site Domain} e.g. https://chat.whoson.com/messaging/api/sms?site=www.whoson.com
- Next set the Webhook method for incoming messages URL should be set to HTTP Post

WhosOn Configuration
- Access SMS Integration from the WhosOn Settings portal
- Select SMS

- Select Enable Channel to enable SMS integration

-
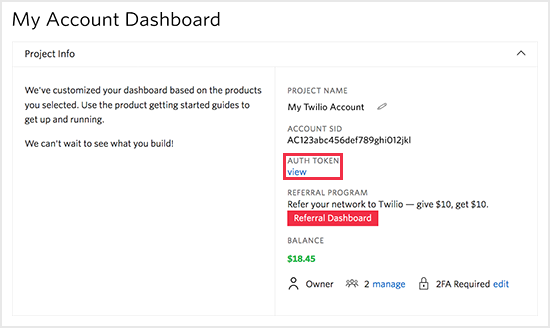
Enter your Twilio Account SID, Auth Token and Phone Number.
-
You can find the Auth Token in the Project Info pane of the Twilio Console Dashboard page.
-
Select "Verify Twilio Account" to ensure details are validated.
- Select "Save Changes"
Create WhatsApp Sender
With a number dedicated to WhosOn/WhatsApp messaging selected, a WhatsApp Sender needs to be created for that number. This register the customers Phone Number with WhatsApp and will inform Twilio as to where it should direct incoming messages to. To create one, the follow steps should be performed:
- Navigate to Programmable Messaging -> Senders -> WhatsApp Senders
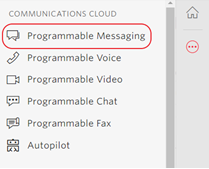
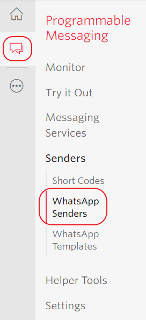
- Select New WhatsApp Sender or Sign up to request access
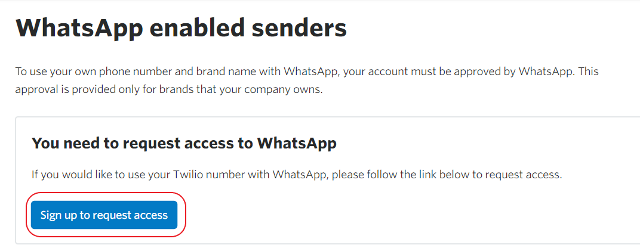
- Fill in the fields accordingly
- From the Select A Number dropdown, choose the previously defined phone number from the list
- The Business Display Name should reflect the customers site that they intend to use the number with
- Other fields are optional but again, these should be based around the particular site that the number is intended for use with, rather than a parent company for example.
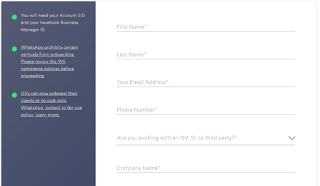
- Submit Request

Once a request has been submitted, it will need to be approved by WhatsApp, this may take some time. Should WhatsApp decline, there may be some changes that are required before the sender can be submitted again.
Configure WhatsApp Sender
Once the WhatsApp Sender has been created and approved by WhatsApp, it can now be configured to work with Whoson
- Select the desired Sender from the list and fill in the fields accordingly

- Ensure that Use Webhooks is selected
- Webhook URL for incoming messages is where Twilio will direct any WhatsApp messages being sent to the configured number.
- This should be set to the match the following structure: http://{server address}/messaging/api/whatsapp?site={Site Domain} e.g. http://chat.whoson.com/messaging/api/whatsapp?site=www.whoson.com
- Webhook method for incoming messages URL should be set to HTTP Post
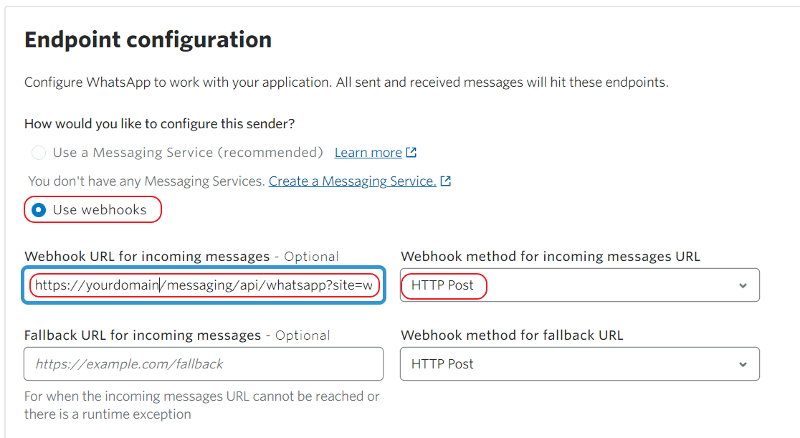
- Once these changes have been made, Update WhatsApp Sender to save.

WhatsApp Integration
Requirements
Please note a Twilio account is required to proceed. For more information visit Twilio
- Access WhatsApp Integration from the WhosOn Settings portal
- Select WhatsApp
- Select Enable Channel to enable WhatsApp integration
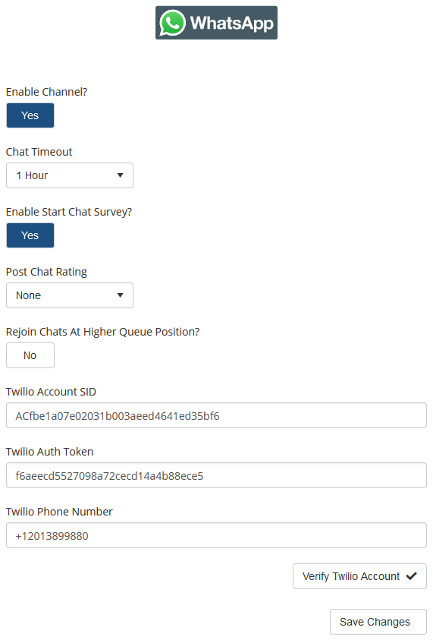
- Enter your Twilio Account SID, Auth Token and Phone Number.
- You can find the Auth Token in the Project Info pane of the Twilio Console Dashboard page.

- You can find the Auth Token in the Project Info pane of the Twilio Console Dashboard page.
- Select "Verify Twilio Account" to ensure details are validated.
- Select "Save Changes"
Configuring Callback Integration
Requirements
- A Twilio account Twilio
-
A Twilio phone number
-
Select "Enable Twilio", then enter your Twilio "Account SID, Auth Token, and Phone number" and verify your Twilio account.
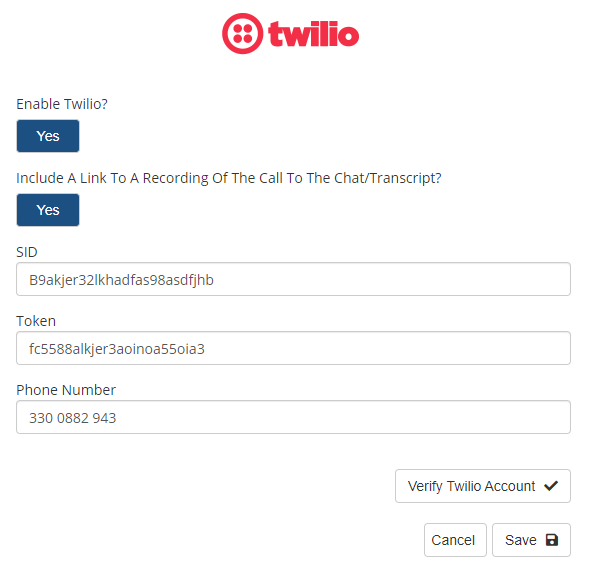
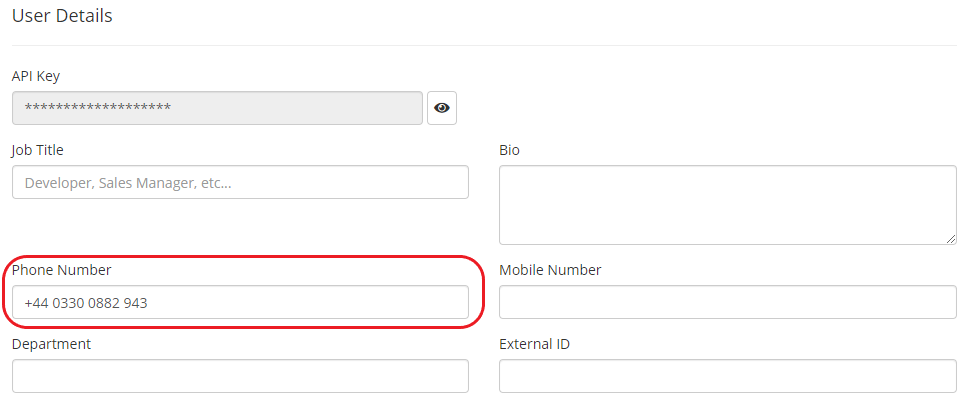
- Next, navigate to your users in the settings portal, and ensure a phone number is listed under each user that will be using the callback feature.
- In order for the callback feature to be available to customers, offline behaviour needs to be set to "Show Offline Form", under chat designer.

- Next, navigate to Chat Designer -> Offline settings, and enable "Allow visitor to request callback".
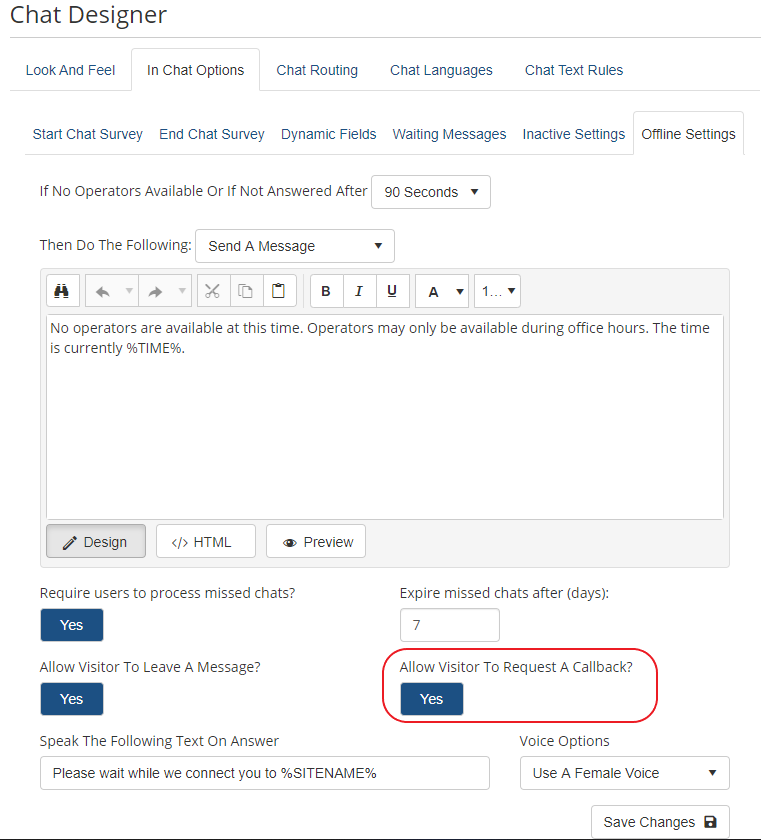
- During offline (out of hours, no agents are in an online status) visitors will now be presented with the callback option in the leave a message form.
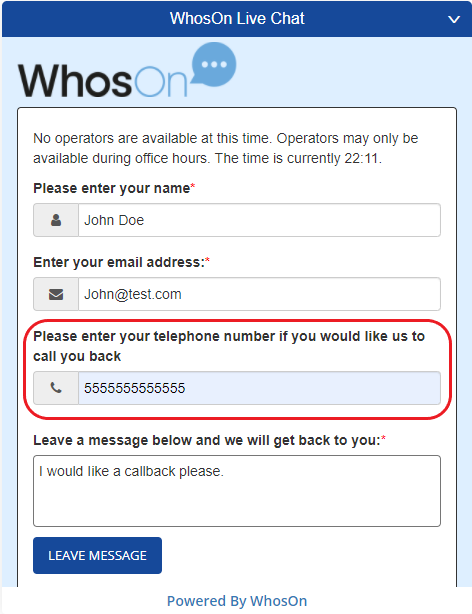
- Once a visitor leaves a message with a callback number, a chat agent will now find the callback request under "Missed Chats" in the client.
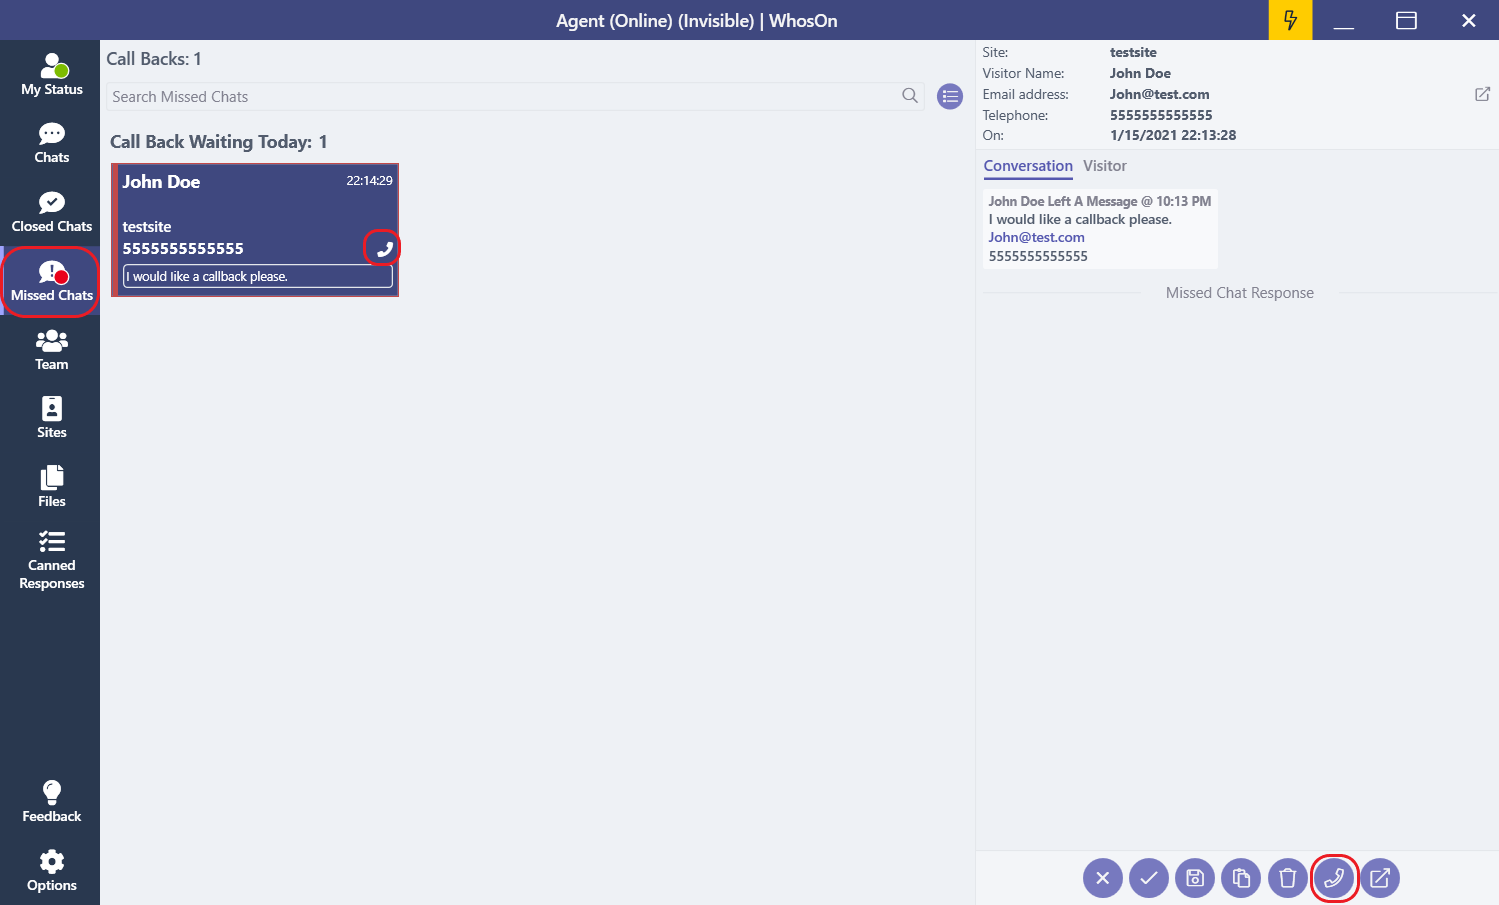
- Click the missed chat and the message details will appear on the right side of the client.
- Select the callback option (phone icon) and enter the visitors phone number. (please note, you may have to correct the phone number prior to calling as the country code and/or area code might not be entered correctly).
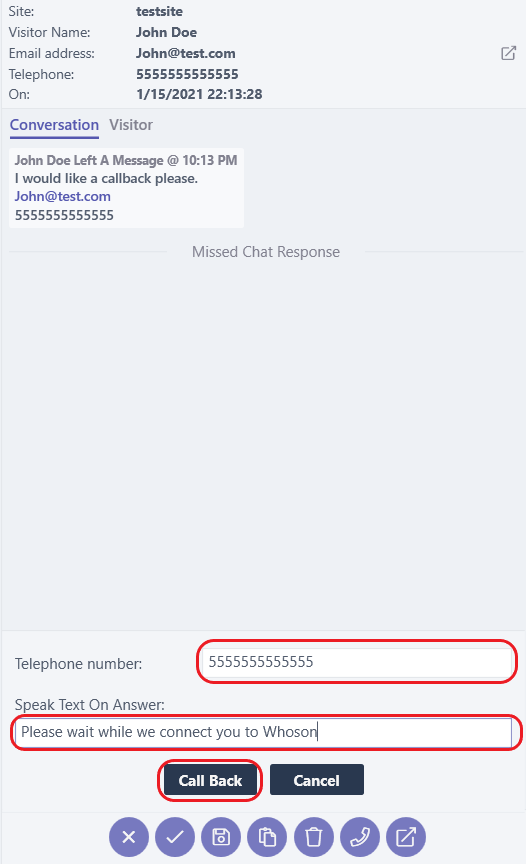
- The "Speak Text On Answer", will be the message the visitor hears when he/she picks up the call.
- Select "Callback" and WhosOn, will attempt to initiate the call through Twilio, to the visitor. Once the visitor answers the call, Twilio will now connect/call that agent on the agent's phone number provided in their user profile.
Configuring in-chat calls
Requirements
- A Twilio account Twilio
-
A Twilio phone number
-
Select "Enable Twilio", then enter your Twilio "Account SID, Auth Token, and Phone number" and verify your Twilio account.

- Next, navigate to your users in the settings portal, and ensure a phone number is listed under each user that will be using the callback feature.

- In the client when in a chat there will be a "phone" icon to click at the top of the chat conversation.
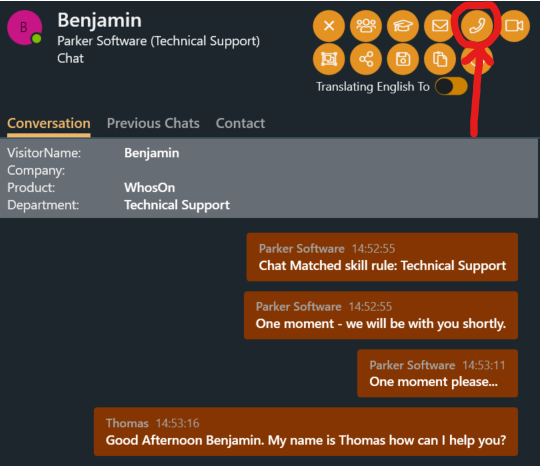
- Enter in the visitor's telephone number, this should auto-populate if the number has been sent in the conversation.
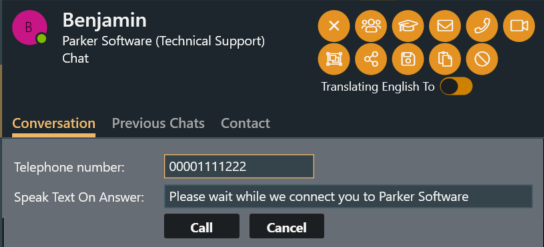
- Click Call
- Twilio will now telephone the visitor.
- After the visitor picks up Twilio will then telephone the operator and link the two calls together.
NetSuite Integration
This integration was developed in collaboration with one of our customers, our support desk are unable to assist with implementing or troubleshooting this specific integration.
This guide provides a basic outline of how to update NetSuite customer records with details from live chats.
Cloud customers:
You will need to send Parker Software your suitlet URL which we will then POST the chat data to.
Installable customers:
You need to add your Suitlet URL to the WhosOn Server's Chat Archiving -> Post Chat JSON to URL section of the WhosOn Service Manager.
The Chat data
WhosOn will POST the data to your Suitlet URL with a JSON formatted transcript, like the below:
{
    "id": "0e75hw4p6r",
    "Site": {
      "Domain": "www.parkersoft.co.uk",
      "Name": "Parker Software"
    },
    "Visitor": {
      "Name": "Test",
      "CompanyName": "Company",
      "IPAddress": "0.0.0.0",
      "DNS": "parkersoftware.com",
      "Page": "settings/TestPage.aspx?domain=www.parkersoft.co.uk",
      "EntryAlert": "Default (All Visitors)",
      "EmailAddress": "test@test.com",
      "PhoneNumber": "",
      "VisitNumber": 1,
      "VisitDate": "2022-05-26T15:54:52.287",
      "FirstPage": "settings/TestPage.aspx?domain=www.parkersoft.co.uk",
      "PageViews": 1,
      "Referer": "",
      "OperatingSystem": "Windows 10",
      "Browser": "Chrome 102",
      "Prospect": false,
      "Customer": false,
      "GeoIP": null,
      "GeoIPLocation": null,
      "Language": "en",
      "ContactRecord": {
        "Name": "Test",
        "EmailAddress": "test@test.com",
        "PhoneNumber": "",
        "CompanyName": "Test",
        "Street": "",
        "City": "",
        "ZIP": "",
        "Country": "",
        "WebAddress": "",
        "CRMID": "",
        "Notes": ""
      }
    },
    "Operators": \[
      {
        "Name": "Training Admininstrator",
        "Department": "",
        "Skills": "Account Management,Technical Support,Customer Services",
        "EmailAddress": "support@parkersoftware.com",
        "PhoneNumber": "",
        "IsBot": false,
        "Username": "TrainingAdmin"
      }
    \],
    "Started": "2022-05-26T15:56:18.493",
    "Finished": "2022-05-26T16:06:36.62",
    "Invited": false,
    "Taken": true,
    "RequestedDepartment": "",
    "RequestedUserName": null,
    "RequestedSkills": \[
      "Technical Support"
    \],
    "RequestedTranslation": false,
    "RequestedCallBack": false,
    "RequestedCallBackOn": "0001-01-01T00:00:00",
    "WaitedForSeconds": 51,
    "ChattedForSeconds": 618,
    "PreChatSurvey": \[
      {
        "FieldName": "Company",
        "FieldValue": "Company"
      },
      {
        "FieldName": "Product",
        "FieldValue": "WhosOn"
      },
      {
        "FieldName": "Department",
        "FieldValue": "Technical Support"
      }
    \],
    "PostChatSurvey": \[
      {
        "FieldName": "NPS",
        "FieldValue": "10"
      },
      {
        "FieldName": "UpgradeTranscript",
        "FieldValue": "test@test.com"
      }
    \],
    "Transcript": \[
      {
        "Number": 1,
        "Dated": "2022-05-26T15:55:27.467",
        "IsLink": false,
        "IsVisitor": false,
        "IsOperator": true,
        "IsServerMessage": true,
        "OperatorName": "Parker Software",
        "Translated": "",
        "FileName": null,
        "FileURL": null,
        "Text": "Chat Matched skill rule: Technical Support"
      },
      {
        "Number": 2,
        "Dated": "2022-05-26T15:55:27.467",
        "IsLink": false,
        "IsVisitor": false,
        "IsOperator": true,
        "IsServerMessage": true,
        "OperatorName": null,
        "Translated": "",
        "FileName": null,
        "FileURL": null,
        "Text": "\[MR\] Chat Matched skill rule: Technical Support"
      },
      {
        "Number": 3,
        "Dated": "2022-05-26T15:55:27.577",
        "IsLink": false,
        "IsVisitor": false,
        "IsOperator": true,
        "IsServerMessage": true,
        "OperatorName": "Parker Software",
        "Translated": "",
        "FileName": null,
        "FileURL": null,
        "Text": "Please wait. An operator will be with you shortly."
      },
      {
        "Number": 4,
        "Dated": "2022-05-26T15:55:42.973",
        "IsLink": false,
        "IsVisitor": false,
        "IsOperator": true,
        "IsServerMessage": true,
        "OperatorName": "Parker Software",
        "Translated": "",
        "FileName": null,
        "FileURL": null,
        "Text": "One moment please..."
      },
      {
        "Number": 5,
        "Dated": "2022-05-26T15:55:57.577",
        "IsLink": false,
        "IsVisitor": false,
        "IsOperator": true,
        "IsServerMessage": true,
        "OperatorName": "Parker Software",
        "Translated": "",
        "FileName": null,
        "FileURL": null,
        "Text": "Sorry for the delay..."
      },
      {
        "Number": 6,
        "Dated": "2022-05-26T15:56:18.493",
        "IsLink": false,
        "IsVisitor": false,
        "IsOperator": true,
        "IsServerMessage": true,
        "OperatorName": null,
        "Translated": "",
        "FileName": null,
        "FileURL": null,
        "Text": "\[OP\] Operator daniel.horton picked up chat session. (Test)"
      },
      {
        "Number": 7,
        "Dated": "2022-05-26T15:56:33.167",
        "IsLink": false,
        "IsVisitor": false,
        "IsOperator": true,
        "IsServerMessage": false,
        "OperatorName": null,
        "Translated": "",
        "FileName": null,
        "FileURL": null,
        "Text": "Something to test with"
      },
      {
        "Number": 8,
        "Dated": "2022-05-26T15:56:33.167",
        "IsLink": false,
        "IsVisitor": false,
        "IsOperator": true,
        "IsServerMessage": true,
        "OperatorName": null,
        "Translated": "",
        "FileName": null,
        "FileURL": null,
        "Text": "\[FL1\] First line received from operator. (Test)"
      },
      {
        "Number": 9,
        "Dated": "2022-05-26T15:56:41.71",
        "IsLink": false,
        "IsVisitor": true,
        "IsOperator": false,
        "IsServerMessage": false,
        "OperatorName": null,
        "Translated": "",
        "FileName": null,
        "FileURL": null,
        "Text": "Response"
      },
      {
        "Number": 10,
        "Dated": "2022-05-26T15:56:45.893",
        "IsLink": false,
        "IsVisitor": false,
        "IsOperator": true,
        "IsServerMessage": false,
        "OperatorName": null,
        "Translated": "",
        "FileName": null,
        "FileURL": null,
        "Text": "Reply"
      },
      {
        "Number": 11,
        "Dated": "2022-05-26T16:00:36.077",
        "IsLink": false,
        "IsVisitor": false,
        "IsOperator": true,
        "IsServerMessage": false,
        "OperatorName": null,
        "Translated": "",
        "FileName": null,
        "FileURL": null,
        "Text": "# Markdown\\r\\n\\r\\nCanned Responses and operator sent lines can now contain \*\*MarkDown\*\*\\r\\n  \\r\\nMarkdown can be \*\*bold\*\* \*italics\* ~~strikethru~~\\r\\n\\r\\n  1. List item1\\r\\n  2. List item2\\r\\n\\r\\n| Tables          | Are               | Cool    |\\r\\n| ------------- |:--------------:| -------:|\\r\\n| col 3 is        | right-aligned | $1600 |\\r\\n| col 2 is        | centered        | $12     |\\r\\n\\r\\n> This is a note\\r\\n\\r\\n\`\`\`\\r\\nthis is a code block\\r\\n\`\`\`\\r\\n\\r\\n> For more info see:\\r\\n> \[MarkDown Guide\](https://www.markdownguide.org/cheat-sheet/)\\r\\n\\r\\nEmbedded Image !\[WhosOn\](https://www.whoson.com/img/whoson-logo-sm.png)"
      },
      {
        "Number": 12,
        "Dated": "2022-05-26T16:02:51.65",
        "IsLink": false,
        "IsVisitor": true,
        "IsOperator": false,
        "IsServerMessage": false,
        "OperatorName": null,
        "Translated": "",
        "FileName": null,
        "FileURL": null,
        "Text": "Can you please tell me about your GDRP policy?"
      },
      {
        "Number": 13,
        "Dated": "2022-05-26T16:03:25.39",
        "IsLink": false,
        "IsVisitor": true,
        "IsOperator": false,
        "IsServerMessage": false,
        "OperatorName": null,
        "Translated": "",
        "FileName": null,
        "FileURL": null,
        "Text": "GDPR Policy"
      },
      {
        "Number": 14,
        "Dated": "2022-05-26T16:03:59.883",
        "IsLink": false,
        "IsVisitor": false,
        "IsOperator": true,
        "IsServerMessage": false,
        "OperatorName": null,
        "Translated": "",
        "FileName": null,
        "FileURL": null,
        "Text": "We have all the details for WhosOn's GDPR compliance on https://www.whoson.com/product/security/gdpr/"
      },
      {
        "Number": 15,
        "Dated": "2022-05-26T16:05:43",
        "IsLink": false,
        "IsVisitor": true,
        "IsOperator": false,
        "IsServerMessage": false,
        "OperatorName": null,
        "Translated": "",
        "FileName": null,
        "FileURL": null,
        "Text": "Response"
      },
      {
        "Number": 16,
        "Dated": "2022-05-26T16:06:36.62",
        "IsLink": false,
        "IsVisitor": false,
        "IsOperator": true,
        "IsServerMessage": false,
        "OperatorName": null,
        "Translated": "",
        "FileName": null,
        "FileURL": null,
        "Text": "Reply"
      },
      {
        "Number": 17,
        "Dated": "2022-05-26T16:15:38.9",
        "IsLink": false,
        "IsVisitor": false,
        "IsOperator": true,
        "IsServerMessage": true,
        "OperatorName": null,
        "Translated": "",
        "FileName": null,
        "FileURL": null,
        "Text": "\[OC\] Operator daniel.horton forced closed session."
      },
      {
        "Number": 18,
        "Dated": "2022-05-26T16:15:38.913",
        "IsLink": false,
        "IsVisitor": false,
        "IsOperator": true,
        "IsServerMessage": true,
        "OperatorName": "Parker Software",
        "Translated": "",
        "FileName": null,
        "FileURL": null,
        "Text": "Operator daniel.horton forced closed session."
      },
      {
        "Number": 19,
        "Dated": "2022-05-26T16:16:13.517",
        "IsLink": false,
        "IsVisitor": false,
        "IsOperator": true,
        "IsServerMessage": true,
        "OperatorName": null,
        "Translated": "",
        "FileName": null,
        "FileURL": null,
        "Text": "\[PS\] Post-chat survey submitted (Test)"
      },
      {
        "Number": 20,
        "Dated": "2022-05-26T16:16:14.127",
        "IsLink": false,
        "IsVisitor": false,
        "IsOperator": true,
        "IsServerMessage": false,
        "OperatorName": null,
        "Translated": "",
        "FileName": null,
        "FileURL": null,
        "Text": "Email sent to test@test.com for site: Parker Software"
      }
    \],
    "TelephoneCalls": null,
    "Rating": 0,
    "SentimentScore": 0,
    "WrapUpValue": "Demonstration",
    "Tags": null,
    "Missed": false,
    "MissedResponded": false,
    "MissedRespondedBy": null,
    "MissedRespondedDate": "0001-01-01T00:00:00",
    "Summary": "Canned responses and operator sent lines can now contain markdown.",
    "LeftMessageMessage": "",
    "TranscriptURL": "https://chat.whoson.com/whosoncharts/chatview.aspx",
    "WebServicesURL": "https://chat.whoson.com/whosoncharts/"
  }
In NetSuite
Using Suitlets you can script how NetSuite processes the data and how it appends it to your customer records within NetSuite.
You can review NetSuite's documentation on Suitlets to assist you in building your Suitlet:
https://docs.oracle.com/en/cloud/saas/netsuite/ns-online-help/section_4387799600.html
https://docs.oracle.com/en/cloud/saas/netsuite/ns-online-help/article_159074784880.html
Here is an example of the script used by one of our customers:
/\*\*
   \* Copyright Holcros Ltd 2022
   \*
   \* @summary Logs Live-Chats from WhosOn against the customer's profile
   \*
   \* @author Daniel Saunders
   \*
   \* Created at     : 2022-06-15 10:33
   \* Last modified  : 2022-06-20 16:06
   \*
   \*
   \* @NApiVersion 2.x
   \* @NScriptType Suitelet
   \* @NModuleScope SameAccount
   \*/

  define(\['N/record', 'N/search', 'N/log', 'N/email', 'N/render'\],
  function( m\_record, m\_search, m\_log, m\_email, m\_render) {
    var data = {};

  /\*
  Script Entry Point
  \*/
      function onRequest(context) {
      data.context = context;
          if(context.request.method === 'POST') {
        // The method was a POST request
        var responceJson = processPOST();
        return data.context.response.write(JSON.stringify(responceJson));
          } else {
        // the method was not a POST request
        return null;
      }
      }

  /\*
  Functions
  \*/

    function DebugMessage(n,g){string\_chop=function(n,g){return null\==n?\[\]:(n=String(n),(g=~~g)>0?n.match(new RegExp(".{1,"+g+"}","g")):\[n\])};for(var t=string\_chop(g,999),e=0;e<t.length;e++)m\_log.debug(n,t\[e\])}

    function processPOST() {
        try {

          // Extract the caller's IP from the request header
          var requestFrom = data.context.request.clientIpAddress;

          // Extract the data from the request body
          var requestBody = data.context.request.body;

          // Check to payload to ensure that it contains data
          if(requestBody == null) { throw 'Request payload was missing'; }
          if(requestBody.length == 0) { throw 'Request payload was empty'; }

          // Try to decode the payload
          var payload = null;
          try {
            payload = JSON.parse(requestBody);
          }
          catch(err) { throw 'Request payload was not in the correct format'; }


          DebugMessage('payload', JSON.stringify(payload) );


          // Check the email address exists
          var lookupEmailAddress = payload.Visitor.EmailAddress;
          // If there was not an email address in the visitor header, pull it from the pre-chat survey directly
          if(lookupEmailAddress == null) {
            for(var i = 0; i < payload.PreChatSurvey.length; i++) {
              if(payload.PreChatSurvey\[i\].FieldName == "email") {
                lookupEmailAddress = payload.PreChatSurvey\[i\].FieldValue;
              }
            }
          }

          if(lookupEmailAddress == null) { throw 'A Required Parameter was not set'; }


          // Log the request
          DebugMessage('Post Request', "Chat transcript for " + JSON.stringify(lookupEmailAddress) + " posted by " + JSON.stringify(requestFrom) );

          // Check if the chat already exists by searching for its ID in the title,
          // so that we can create the chat if it doesn't exist, or update the existing message.
          var callSearch = m\_search.create({
              type: m\_search.Type.PHONE\_CALL,
              title: 'WOA - Call Lookup',
              id: 'customsearch\_woa\_calllookup',
              columns: \[
                { name: 'internalid' }, { name: 'externalid' }
              \],
              filters: \[
                { name: 'formulanumeric', operator: m\_search.Operator.EQUALTO, formula: "CASE WHEN ( {title} LIKE '% | " + payload.id + "') THEN 1 ELSE 0 END", values: \[ 1 \] }
              \]
            });
          var callResults = callSearch.run().getRange({ start: 0, end: 1 });

          // If the chat record exists, store its ID in callInternalID
          var callInternalID = null;
          if(callResults.length > 0) {
            callInternalID = callResults\[0\].getValue('internalid');
          }

          // Extract the customer name from the request
          var customerName = payload.Visitor.Name;

          // In case we can't access an operator name on the line level
          // (for some reason it's sometimes null?)
          var fallbackOperatorName = '';
          if(payload.Operators) {
            if(payload.Operators.length > 0) {
              if(payload.Operators\[0\].Name) {
                fallbackOperatorName = payload.Operators\[0\].Name;
              }
            }
          }


          var phoneCall = null;
          if(callInternalID == null) {

            /\*
              Existing Call - Update the chat log
            \*/

            // Try to extract the sales order number and the case number from the pre-chat survey
            var prechatSalesOrderNumber = null;
            var prechatSupportCaseNumber = null;
            for(var i = 0; i < payload.PreChatSurvey.length; i++) {
              if(payload.PreChatSurvey\[i\].FieldName == "SaleOrderNumber") {
                prechatSalesOrderNumber = payload.PreChatSurvey\[i\].FieldValue;
              }
              if(payload.PreChatSurvey\[i\].FieldName == "SupportCaseNumber") {
                prechatSupportCaseNumber = payload.PreChatSurvey\[i\].FieldValue;
              }
            }


            // Find the internalid of the customer customer from the email address
            var customerSearch = m\_search.create({
              type: m\_search.Type.CUSTOMER,
              title: 'WOA - Customer Lookup',
              id: 'customsearch\_woa\_customerlookup',
              columns: \[
                { name: 'internalid' }, { name: 'entityid' }
              \],
              filters: \[
                { name: 'email', operator: 'is', values: \[lookupEmailAddress\] }
              \]
            });
            var customerResults = customerSearch.run().getRange({ start: 0, end: 1 });

            // If the customer record exists, store its ID in customerID
            var customerID = null;
            if(customerResults.length > 0) {
              customerID = customerResults\[0\].getValue('internalid');
            }


            // Find the internalid of the support case from the case number
            var caseID = null;
            if(prechatSupportCaseNumber) {
              var caseSearch = m\_search.create({
                type: m\_search.Type.SUPPORT\_CASE,
                title: 'WOA - Case Lookup',
                id: 'customsearch\_woa\_caselookup',
                columns: \[
                  { name: 'internalid' }, { name: 'casenumber' }
                \],
                filters: \[
                  { name: 'casenumber', operator: 'is', values: \[ prechatSupportCaseNumber \] }
                \]
              });
              var caseResults = caseSearch.run().getRange({ start: 0, end: 1 });

              // If the case record exists, store its ID in caseID
              if(caseResults.length > 0) {
                caseID = caseResults\[0\].getValue('internalid');
              }
            }


            // Find the internalid of the Sales Order from the sales order number
            var transactionID = null;
            if(prechatSalesOrderNumber) {
              var transactionSearch = m\_search.create({
                type: m\_search.Type.SALES\_ORDER,
                title: 'WOA - Transaction Lookup',
                id: 'customsearch\_woa\_transactionlookup',
                columns: \[
                  { name: 'internalid' }, { name: 'tranid' }, { name: 'entity' }
                \],
                filters: \[
                  { name: 'tranid', operator: 'is', values: \[ prechatSalesOrderNumber \] }
                \]
              });
              var transactionResults = transactionSearch.run().getRange({ start: 0, end: 1 });

              // If the sales order record exists, store its ID in transactionID
              if(transactionResults.length > 0) {
                transactionID = transactionResults\[0\].getValue('internalid');

                // Force the customer to be this one - in case they have more than one profile somehow
                DebugMessage('Customer Force Change', JSON.stringify(customerID) + ' -> ' + JSON.stringify(transactionResults\[0\].getValue('entity')) + ' - changed to match sales order' );
                customerID = transactionResults\[0\].getValue('entity');

              }
            }


            // Create the chat record as a phone call
            phoneCall = m\_record.create({
              type: m\_record.Type.PHONE\_CALL,
              isDynamic: true
            });

            // If a customer record matched an email address, link it to the chat
            if(customerID) {
              phoneCall.setValue({ fieldId: 'company', value: customerID, ignoreFieldChange: true });
            }

            // If a phone number was present, add it to the chat
            if(payload.Visitor.PhoneNumber) {
              if(payload.Visitor.PhoneNumber.length > 6) {
                phoneCall.setValue({ fieldId: 'phone', value: payload.Visitor.PhoneNumber, ignoreFieldChange: true });
              }
            }

            // Set the chat's title, including the id
            phoneCall.setValue({ fieldId: 'title', value: 'Live Chat With ' + payload.Operators\[0\].Name + ' | ' + payload.id, ignoreFieldChange: true });

            // Mark the status of the call complete
            phoneCall.setValue({ fieldId: 'status', value: 'COMPLETE', ignoreFieldChange: true });

            // Organiser - If we don't set it NetSuite marks it as "System"
            ////phoneCall.setValue({ fieldId: 'assigned', value: -1, ignoreFieldChange: true });

            // Set the date of the chat from the request
            var d = new Date();
            phoneCall.setValue({ fieldId: 'startdate', value: d, ignoreFieldChange: true });

            // If a support case record matched an id, link it to the chat
            if(caseID) {
              phoneCall.setValue({ fieldId: 'supportcase', value: caseID, ignoreFieldChange: true });
            }

            // If a sales order record matched an id, link it to the chat
            if(transactionID) {
              phoneCall.setValue({ fieldId: 'transaction', value: transactionID, ignoreFieldChange: true });
            }

            // Log the successful creation of the chat log
            DebugMessage('Created', "Created new call");
          } else {
            /\*
              Existing Call
            \*/

            // load the existing call record
            phoneCall = m\_record.load({
              type: m\_record.Type.PHONE\_CALL,
              id: callInternalID,
              isDynamic: true
            });

            // Log the successful update of the chat record
            DebugMessage('Updated', "Updated call " + JSON.stringify(callInternalID));
          }


          // Message field variable
          var messages = "";

          // Add the Pre-Chat Survey to the message field
          messages += 'Pre Chat Survey:\\n';
          if(payload.PreChatSurvey) {
            for(var i = 0; i < payload.PreChatSurvey.length; i++) {
              messages += payload.PreChatSurvey\[i\].FieldName + ': ' + payload.PreChatSurvey\[i\].FieldValue + '\\n';
            }
          }
          messages += '-----------\\n';

          // Add the Post-Chat Survey to the message field
          messages += 'Post Chat Survey:\\n';
          if(payload.PostChatSurvey) {
            for(var i = 0; i < payload.PostChatSurvey.length; i++) {
              messages += payload.PostChatSurvey\[i\].FieldName + ': ' + payload.PostChatSurvey\[i\].FieldValue + '\\n';
            }
          }
          messages += '-----------\\n';

          // Add the Tags to the message field
          if(payload.Tags) {
            messages += 'Tags:' + payload.Tags.join(',') + '\\n';
          }

          // Add the Wrap Up Value to the message field
          if(payload.WrapUpValue) {
            messages += 'Wrap Up: ' + payload.WrapUpValue + '\\n';
          }
          messages += '-----------\\n\\n';


          // Add the Chat Messages to the message field
          for(var i = 0; i < payload.Transcript.length; i++) {

            if(payload.Transcript\[i\].IsServerMessage) {
              // Server messages
              messages += '🖥 ' + payload.Transcript\[i\].Text + '\\n\\n';
            }
            else if(payload.Transcript\[i\].IsOperator) {
              // Operator messages
              if(payload.Transcript\[i\].OperatorName) {
                messages += '🤵(' + payload.Transcript\[i\].OperatorName + '): ' + payload.Transcript\[i\].Text + '\\n\\n';
              } else {
                messages += '🤵(' + fallbackOperatorName + '): ' + payload.Transcript\[i\].Text + '\\n\\n';
              }
            }
            else if(payload.Transcript\[i\].IsVisitor) {
              // Customer messages
              messages += '🧝(' + customerName + '): '  + payload.Transcript\[i\].Text + '\\n\\n';
            }
            else {
              // Other messages - links and such
              messages += '📕 <' + payload.Transcript\[i\].Text + '>\\n\\n';
            }
          }

          // If the message is too long for the field make a note of it in the logs
          if(messages.length > 4000) {
            DebugMessage('Warning', "Chat log truncated to 4000 characters ");
          }

          // truncate to the max length of 4000 characters.
          phoneCall.setValue({ fieldId: 'message', value: messages.substring(0, 4000), ignoreFieldChange: true });


          // Save the chat log
          var callID = phoneCall.save({
             enableSourcing: false,
             ignoreMandatoryFields: false
           });

          // Return OK to the requesting server
          return {success: true, message: "OK"};
        }
        catch(err) {
          // Log the error
           m\_log.error({ title: 'Error', details: JSON.stringify(err.message) });
           m\_log.debug({ title: 'Debug', details: JSON.stringify(err) });
           // Return the error to the requesting server
          return {success: false, message: JSON.stringify(err.message)};
        }
        // This can't happen, but if it does, return the error to the requesting server
        return {success: false, message: "General Error"};
    }
      return {
      // Register the entrypoint with NetSuite
          onRequest: onRequest
      };
  });